How to Make the Best Apple Spice Cake from Scratch

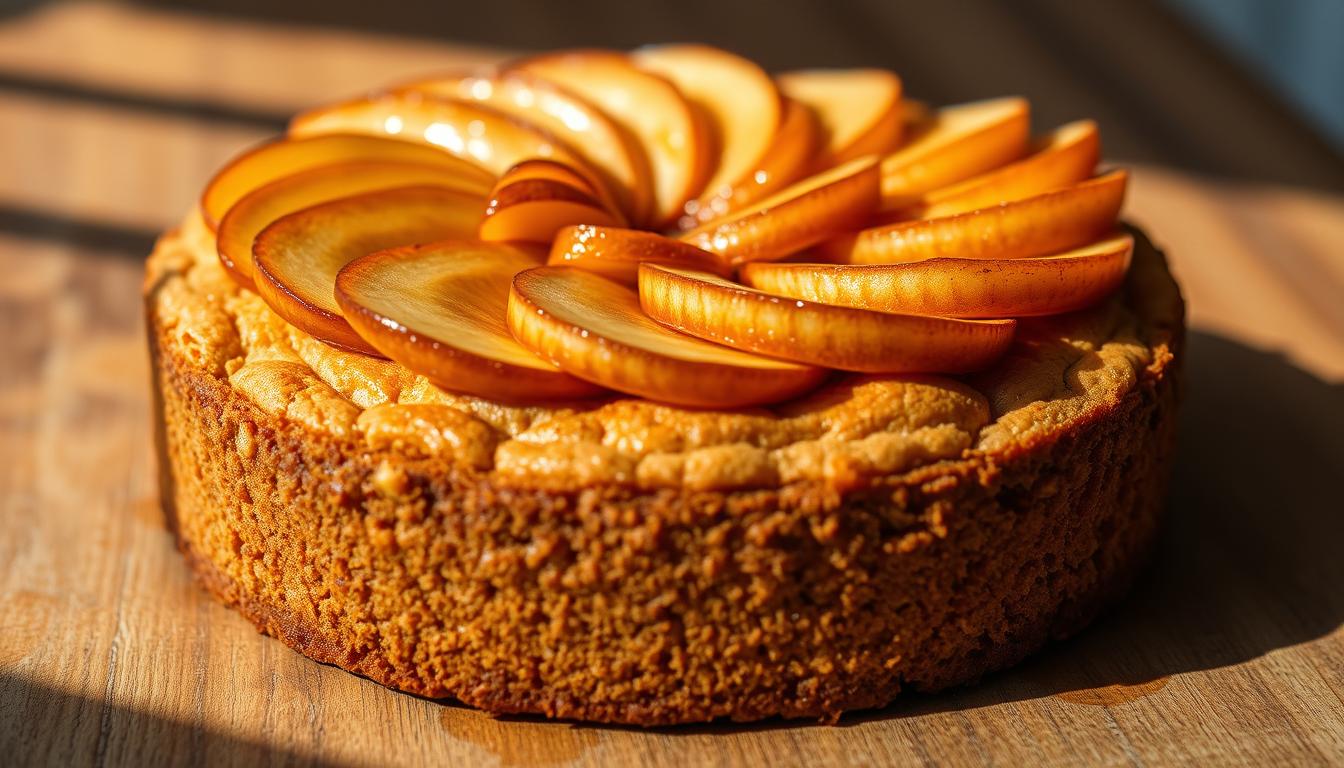
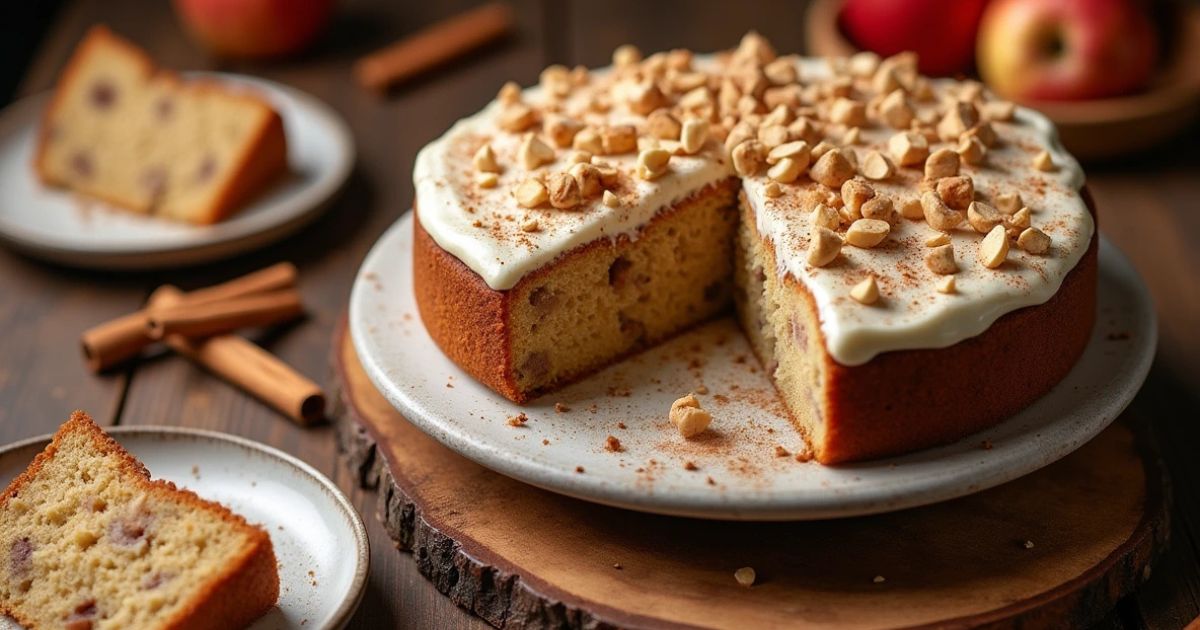
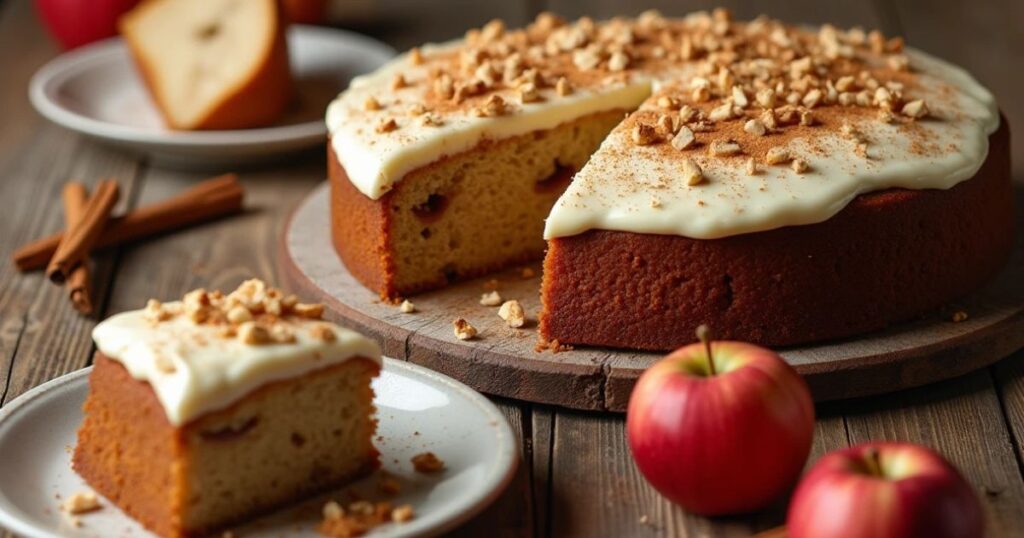
Apple spice cake—just the name alone makes your mouth water, doesn’t it? This deliciously spiced dessert combines the natural sweetness of apples with the warmth of cinnamon, nutmeg, and cloves. Imagine biting into a moist, fluffy slice of cake with the perfect balance of flavors, topped with a sweet glaze or cream cheese frosting. Doesn’t it sound divine?

I’ll let you in on a little secret: apple spice cake is one of those recipes that can easily become your go-to dessert for any occasion. It’s perfect for family gatherings, cozy afternoons, or even when you need a simple, yet special treat. The best part? It’s incredibly easy to make from scratch, and you don’t need fancy ingredients or a ton of experience in the kitchen.

In fact, if you’re a fan of baked goods that are quick to prep and packed with flavor, this apple spice cake is a great addition to your recipe collection. For a delicious twist, try comparing it with my other popular dessert—carrot cake. You’ll see just how versatile baking with spices can be!

What is Apple Spice Cake?

Apple spice cake—what’s not to love about the name? If you’ve ever made or eaten an apple pie, you know the magic that apples and spice bring to a dessert. Now, imagine transforming those same flavors into a soft, spongy cake. The result? Apple spice cake.

It’s the kind of cake that fills your kitchen with the inviting aroma of cinnamon and apples while it bakes. Can you already smell it? “The way to a man’s heart is through his stomach,” they say, and trust me, this apple spice cake will steal anyone’s heart (and probably their second slice, too). It’s the perfect balance of sweet, spicy, and fruity, all in one bite.

Ready to impress your loved ones? You’ll have to try making this simple, yet irresistible cake yourself. You might just be surprised at how easy it is.

Why You’ll Love This Apple Spice Cake

What makes apple spice cake so irresistible? Let’s take a look at three key aspects that will have you hooked from the first bite.

  1. The Main Highlight: Apples and Spices
    The combination of fresh apples and spices like cinnamon, nutmeg, and cloves makes this cake the epitome of fall flavors. The apples add a subtle sweetness and moisture to the cake, while the spices provide a comforting warmth that’s perfect for cooler months. It’s like having your favorite autumn flavors in every bite!
  2. Cost-Saving Benefits
    Making apple spice cake from scratch not only gives you control over the ingredients, but it’s also a cost-effective alternative to buying pre-made cakes from the store. With simple pantry staples like flour, sugar, and eggs, and a few apples, you can create a bakery-quality dessert without breaking the bank.
  3. Flavorful Toppings
    What makes this cake extra special is the versatility of toppings. Whether you prefer a classic cream cheese frosting or a drizzle of caramel sauce, apple spice cake is a blank canvas for creativity. Top it with chopped nuts for a bit of crunch or serve it warm with a scoop of vanilla ice cream for the ultimate indulgence.

If you’re a fan of other spice cakes, you might also enjoy my recipe for pumpkin spice cake—it’s just as flavorful and equally perfect for any fall celebration!

How to Make Apple Spice Cake

Quick Overview:
Making apple spice cake from scratch is easier than you might think. With just a few ingredients and a bit of mixing, you’ll have a cake that’s soft, flavorful, and utterly delicious. Whether you’re baking for a special occasion or simply want a cozy treat for the family, this recipe is a crowd-pleaser.

Key Ingredients:

  • 2 cups all-purpose flour
  • 1 ½ teaspoons baking powder
  • 1 teaspoon baking soda
  • 1 teaspoon cinnamon
  • ½ teaspoon ground nutmeg
  • ¼ teaspoon ground cloves
  • ½ teaspoon salt
  • 1 cup granulated sugar
  • ½ cup brown sugar, packed
  • 2 large eggs
  • 1 cup vegetable oil
  • 2 teaspoons vanilla extract
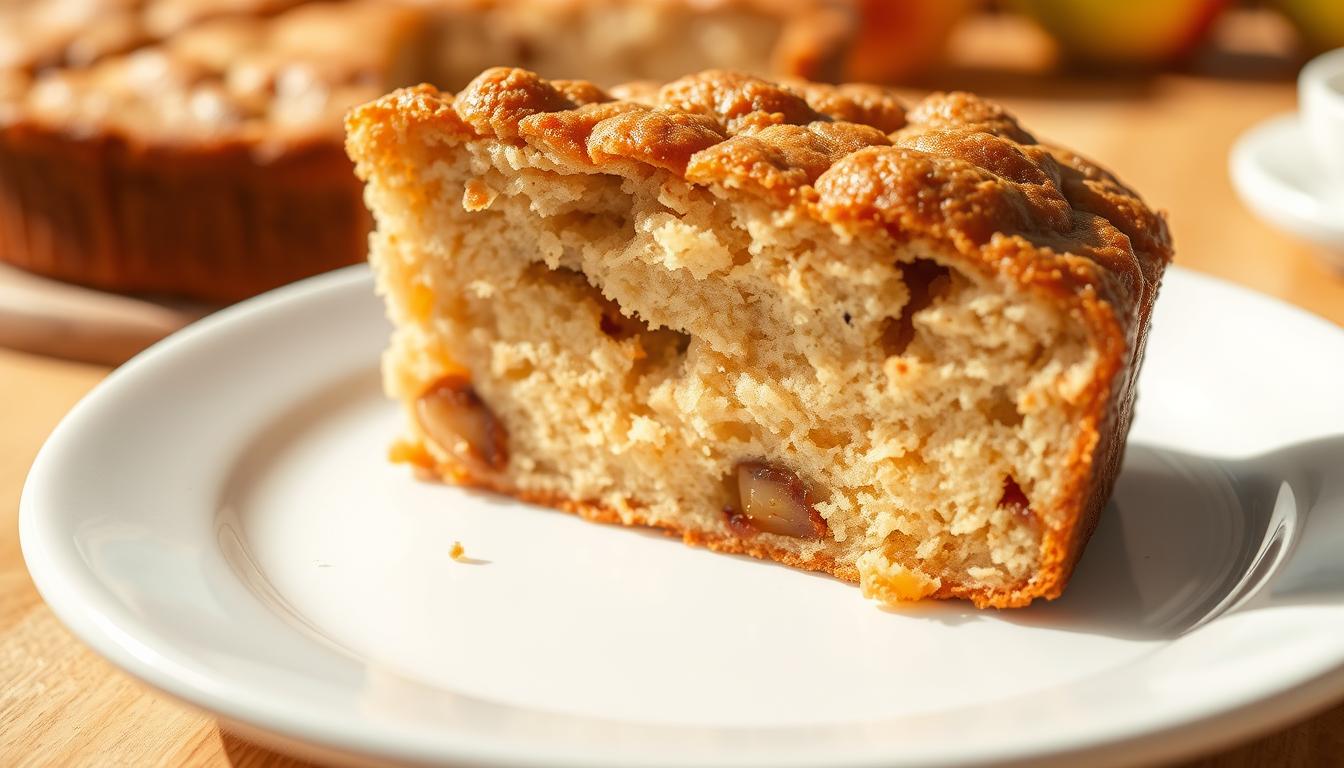
  • 2 cups apples, peeled, cored, and chopped (about 2 medium apples)
  • 1 cup buttermilk (or regular milk if you prefer)

Step-by-Step Instructions:

  1. Preheat Your Oven and Prepare the Pan
    Start by preheating your oven to 350°F (175°C). Grease and flour a 9-inch round cake pan or line it with parchment paper for easy removal.
  2. Mix Dry Ingredients
    In a medium bowl, whisk together the flour, baking powder, baking soda, cinnamon, nutmeg, cloves, and salt. Set aside.
  3. Blend Wet Ingredients
    In a large mixing bowl, beat together the granulated sugar, brown sugar, eggs, oil, and vanilla extract. Use an electric mixer on medium speed until the mixture is smooth and well-combined.
  4. Add the Apples
    Gently fold in the chopped apples. The fresh apples add a delicious burst of flavor and moisture to the cake, so don’t skimp on them!
  5. Combine Wet and Dry Ingredients
    Gradually add the dry ingredients to the wet mixture, alternating with the buttermilk. Mix until just combined—don’t overmix to keep the cake light and fluffy.
  6. Bake
    Pour the batter into your prepared cake pan and spread it evenly. Bake for 35-40 minutes or until a toothpick inserted into the center of the cake comes out clean.
  7. Cool and Serve
    Allow the cake to cool in the pan for 10 minutes before transferring it to a wire rack to cool completely. Serve as-is or top with your favorite frosting.

What to Serve Apple Spice Cake With

Apple spice cake pairs perfectly with a variety of dishes and drinks. For a warm, comforting treat, serve it with a dollop of whipped cream or a scoop of vanilla ice cream. If you’re hosting a fall gathering, pair the cake with a cup of hot apple cider or spiced tea for the ultimate cozy dessert experience.

If you want a savory option, serve it alongside a light salad with fresh greens and a tangy vinaigrette to balance out the sweetness of the cake.

Top Tips for Perfecting Apple Spice Cake

  • Use Fresh Apples: Fresh, crisp apples like Granny Smith or Honeycrisp provide the best flavor and texture for your cake. Avoid using apples that are too soft or overripe.
  • Customize the Spices: Feel free to adjust the spices to your liking. Add a bit more cinnamon or a pinch of ground ginger for an extra kick!
  • Don’t Overmix: Be careful not to overmix the batter once the dry ingredients are added. Overmixing can result in a dense, heavy cake instead of a light, fluffy texture.
  • Substitute Ingredients: If you don’t have buttermilk on hand, you can use regular milk or make your own by adding a tablespoon of vinegar to a cup of milk.

Storing and Reheating Tips

Storing Leftovers:
Store any leftover apple spice cake in an airtight container at room temperature for up to 3 days. For longer storage, wrap the cake in plastic wrap and refrigerate it for up to a week.

Reheating:
To reheat, simply warm individual slices in the microwave for 15-20 seconds, or wrap the entire cake in foil and heat in a 350°F (175°C) oven for 10-15 minutes.

Making apple spice cake from scratch is an easy, fun way to bring a taste of fall into your kitchen year-round. It’s simple, flavorful, and perfect for every occasion. Give it a try and enjoy a slice (or two) of this irresistible cake today!

What is Beef Shaved Steak and How to Cook It?

Every kitchen has a secret weapon, and for many, beef shaved steak is it. When I first tried it, my cooking changed forever. Thinly sliced beef made quick, tasty meals possible in minutes.

Beef shaved steak is more than meat; it’s a versatile ingredient that adds restaurant-quality flavor to your kitchen. Sliced to less than a quarter-inch, it turns into many dishes, from Philly cheesesteaks to Asian stir-fries.

Unlike thick steaks, beef shaved steak cooks fast and soaks up marinades well. Whether you choose ribeye for its rich flavor or sirloin for its affordability, it promises exciting flavors in every bite.

Understanding Beef Shaved Steak

Beef shaved steak is a quick-cooking protein loved in Asian and American foods. It’s cut very thin, like paper, for fast cooking and great flavor.

Common Names and Labels

When you look for beef shaved steak, you’ll find different names:

  • Sandwich steak
  • Shabu-shabu beef
  • Stir-fry beef
  • Shaved beef loin steak

Different Cuts Used for Shaving

Chefs and home cooks often choose certain cuts for shaved beef. The top picks are:

  1. Ribeye
  2. Sirloin
  3. Flank steak
  4. Skirt steak

Shaved beef steak is loved for its versatility. In Korea, it’s key for bulgogi dishes. In the U.S., it’s a must in sandwiches like Chicago’s Italian beef and Philadelphia cheesesteaks.

Its quick cooking time, just one to two minutes per side, makes it ideal for fast meals. It’s perfect for those who want tasty, protein-rich dishes without spending a lot of time cooking.

Benefits of Cooking with Shaved Steak

Shaved steak is a great choice for quick meals. Its thin slices cook fast, making your cooking quicker. You can make a classic cheesesteak or try Asian dishes with these slices.

Shaved steak has many benefits for cooking:

  • Rapid cooking time (typically 3-5 minutes)
  • Exceptional marinade penetration
  • Perfect for high-heat cooking methods
  • Versatile ingredient for multiple cuisines

The thin slices cook evenly and fast. This makes your dishes perfect every time. You can make a delicious Philadelphia cheesesteak at home.

Shaved steak is also cost-effective. It cooks faster and uses less meat than thicker cuts. This saves you money and time in the kitchen. You can make sandwiches or stir-fries with it easily.

Essential Equipment for Preparing Beef Shaved Steak

Creating delicious beef shavings needs the right tools and techniques. Whether you’re cooking at home or dreaming of being a chef, the right equipment makes a big difference. It helps you make perfectly sliced steak.

Professional Slicing Tools

Professional chefs use special tools to make precise beef shavings. The best tools include:

  • Commercial meat slicers for uniform, ultra-thin slices
  • Sharp boning knives with flexible blades
  • Heavy-duty cutting boards designed for meat preparation

Home Kitchen Alternatives

Home cooks can get great results with smart alternatives. For sliced steak, try these kitchen tools:

  1. Sharp chef’s knife
  2. Mandoline slicer with adjustable thickness settings
  3. Freezing technique to firm meat for easier cutting

Pro tip: Freeze your steak for 1-2 hours before slicing to ensure thinner, more consistent cuts. Ribeye, skirt steak, and flat iron are excellent cuts for tender beef shavings.

Storage Requirements

Proper storage is key to keeping your beef shavings fresh. Use airtight containers or vacuum-sealed bags to keep them fresh. Refrigerated beef shavings last 3-4 days, while frozen meat can last up to 3 months.

Remember to label your containers with the date you prepared them. This helps you keep track of freshness and ensures the best flavor for your sliced steak dishes.

How to Select Quality Shaved Beef

Choosing the right shredded beef is key for tasty meals. When you’re shopping for shaved roast beef, focus on a few important factors. These ensure you get the best meat.

Look for shaved beef with a bright, even color. It should be fresh and have a smooth texture. Thin, even slices are a sign of high-quality beef.

  • Check for bright red or pink coloration
  • Avoid meat with excessive moisture or liquid in the package
  • Examine the thickness of the slices
  • Verify the sell-by date

When buying shaved beef, keep these tips in mind:

  1. Ask your butcher about the cut of meat used for shaving
  2. Request freshly sliced beef for optimal quality
  3. Ribeye is often the preferred cut for its perfect balance of fat and lean meat
  4. Consider freezing techniques if slicing at home

Pro tip: To get ultra-thin slices at home, freeze your beef for 30-60 minutes before cutting. This makes slicing easier and helps create those perfect, delicate shavings that cook quickly and evenly.

Remember, the quality of your shaved beef affects your dish’s flavor and texture. Take your time to pick the best meat for the tastiest results.

Proper Preparation Techniques

Preparing beef shaved steak needs careful attention for the best taste and texture. Whether it’s beef loin steak or another cut, the right prep makes a big difference.

Thawing Methods

Thawing frozen beef shaved steak safely is key. Here are some methods:

  • Refrigerator thawing: Move the steak from the freezer to the fridge 24 hours before cooking
  • Cold water method: Put sealed meat in cold water, change water every 30 minutes
  • Avoid thawing at room temperature to stop bacterial growth

Marinating Tips

Marinating can make your beef loin steak taste amazing. Here’s how:

  1. Marinate for no more than 24 hours to keep meat texture good
  2. Use acidic ingredients like vinegar or citrus carefully
  3. Marinate in the fridge always

Seasoning Approaches

Seasoning beef shaved steak is an art that can make your meal better. Season well but wisely:

  • Salt and pepper are great base seasonings
  • Try garlic powder, paprika, or herbs for something different
  • Let meat rest at room temperature for 30 minutes before cooking for even seasoning

Pro tip: Shaved steak cooks fast, making it perfect for weeknights. Remember, thinly shaved ribeye should be cut to ⅛ inch-thick slices for the best taste.

Quick Cooking Methods for Beef Shaved Steak

Shaved Beef Cooking Techniques

Cooking shaved beef is quick and tasty. It’s perfect for a delicious shaved beef sandwich or a classic cheesesteak. The secret is to cook it fast at high heat. This keeps the meat tender and full of flavor.

Choosing the right cooking method is important. Here are some top techniques:

  • Skillet Searing: Heat a cast-iron skillet to medium-high and cook for 1-2 minutes per side
  • Stir-Frying: Use a wok with high smoke point oils like canola or peanut oil for fastest cooking
  • Air Fryer Method: Cook at 400°F for 8 minutes for a crispy exterior

For the perfect cheesesteak, follow these pro tips:

  1. Use flank steak for best results
  2. Season with 1/4 tsp salt and 1/4 tsp pepper
  3. Ensure internal temperature reaches 160°F
  4. Cook quickly to maintain tenderness

Shaved beef cooks fast—usually 1-2 minutes per side. Keep an eye on it to avoid overcooking. Overcooking makes the meat tough and dry. You want a juicy, flavorful shaved beef sandwich that’s a delight to eat.

Shaved steak is a game-changer in cooking. It turns simple beef into tasty dishes that everyone loves. Whether it’s classic American sandwiches or Asian meals, steak slices are incredibly versatile.

Philly Cheesesteak: An American Classic

The Philly cheesesteak is a top-notch sandwich. It’s made with tender shaved beef, melted cheese, sautéed onions, and a soft hoagie roll.

Asian Stir-Fry Variations

Asian cuisine loves shaved beef. Stir-fry dishes make these thin slices into quick, tasty meals. They’re ready in under 30 minutes.

Mongolian Beef: A Flavor Explosion

Mongolian beef is a mix of Chinese and American flavors. It has paper-thin beef cooked in a delicious sauce. The ingredients include:

  • Less sodium soy sauce
  • Brown sugar
  • Chili peppers
  • Cornstarch for coating

This dish has about 445 calories per serving. It’s ready in just 30 minutes, making it perfect for busy cooks.

Best Sauce Pairings and Marinades

Beef Shavings Marinades

Choosing the right marinades and sauces can make your sliced steak amazing. Learning to mix flavors can turn beef shavings into a dish that excites your taste buds.

Classic marinades add a lot to shaved beef. A traditional Korean barbecue mix includes:

  • Soy sauce for umami flavor
  • Sesame oil for nutty undertones
  • Honey or brown sugar for sweetness
  • Fresh scallions for brightness
  • Garlic and ginger for aromatic complexity

When preparing beef shavings, consider these tips:

  1. Marinate for 30 minutes to soak up flavors
  2. Use vinegar to tenderize the meat
  3. Balance sweet, salty, and tangy flavors

Looking for something different? Try chimichurri with fresh herbs or teriyaki for an Asian twist. Each sauce adds its own special touch to the tender shaved steak.

Pro tip: Always marinate your sliced steak in a sealed container and refrigerate. This keeps it safe and flavorful.

Side Dishes and Accompaniments

Make your shredded beef meal even better with the right side dishes. These dishes should match the rich flavors of the shaved roast beef. The perfect sides can turn a simple meal into a feast for your taste buds and a healthy choice.

Traditional Sides That Shine

Classic side dishes are great with your shaved beef. Here are some favorites:

  • Fluffy white rice
  • Garlic-parmesan roasted carrots
  • Wild rice with herb blend
  • Crispy air fryer French fries

Vibrant Vegetable Combinations

Vegetable sides add color, nutrition, and fun textures to your meal. Try these tasty vegetable pairings:

  • Grilled Romaine Wedge with light Caesar dressing
  • Smoked corn on the cob with wood chip infusion
  • Summer couscous salad with colorful vegetables
  • Cauliflower fried rice for a low-carb option

When picking sides for your shaved roast beef, aim for a mix of flavors and textures. Include both warm and cold dishes. Add fresh veggies and try new combinations to make your main course even better.

Storage and Leftovers Tips

Proper storage of your beef shaved steak can make it last longer and taste better. Always put leftover beef loin steak in a sealed container within two hours of cooking. It stays fresh for 3 to 4 days in the fridge at 40°F or below.

When reheating, be careful not to dry out the meat. Use a hot cast iron skillet and heat the steak slowly over medium-low heat. Try to get it to 110°F. Quick tip: Adding beef broth helps keep it moist and prevents it from getting tough.

Get creative with your leftover beef. You can use it in tacos, rice bowls, sliders, or quesadillas. Most recipes take under 30 minutes, making meal planning easy and tasty.

To freeze beef loin steak, wrap it tightly in freezer-safe packaging to avoid freezer burn. It stays good for up to three months in the freezer. Thaw it in the fridge overnight before reheating to keep its texture and flavor.

Tagged : / / / / / / / / /

How to Make the Best Tuna Ceviche at Home

Explore the refreshing world of tuna ceviche, a dish that highlights fresh seafood. With a simple recipe, you can make a delicious dish at home. Tuna ceviche is a mix of flavors, with the tuna’s freshness being the main attraction.

Making tuna ceviche at home is easier than you think. It’s a healthy and tasty dish. We’ll show you how to pick the best tuna and prepare your ingredients. You’ll learn to make the best tuna ceviche at home, using a classic recipe and emphasizing fresh seafood.

Key Takeaways

  • Learn how to make a delicious tuna ceviche at home with a simple ceviche recipe
  • Discover the importance of using fresh seafood in your tuna ceviche
  • Get tips on selecting the perfect tuna for your ceviche recipe
  • Understand the basics of preparing ingredients for tuna ceviche
  • Find out how to create a healthy and flavorful dish with tuna ceviche

Understanding Tuna Ceviche: A Fresh and Flavorful Dish

Tuna ceviche has been a favorite in Latin America for centuries. Countries like Mexico and Peru love it. The ceviche history goes back to the Incas, who used citrus juices to keep fish fresh.

Today, tuna is a top pick for ceviche. It’s firm and flavorful. This dish has been passed down, with tuna being a favorite.

Tuna is great for ceviche because it’s very nutritious. It’s full of protein, omega-3s, and vitamins. Eating tuna ceviche can help lower cholesterol and heart disease risk.

  • High protein content
  • Rich in omega-3 fatty acids
  • Low in calories
  • Rich in vitamins and minerals

Tuna ceviche is also delicious and refreshing. It’s perfect for any time of the year. Its rich ceviche history and health benefits make it a hit worldwide.

Essential Equipment for Making Tuna Ceviche

To make tuna ceviche, you’ll need some basic kitchen tools. These include a sharp knife, a cutting board, a bowl, and a fridge. This keeps your ingredients fresh.

For seafood preparation, the right tools are key. A good chef’s knife is vital for handling raw fish. Also, a citrus juicer or manual juicer is handy for the marinade.

Here are some must-have ceviche equipment and tools:

  • Sharp knife
  • Cutting board
  • Bowl
  • Refrigerator
  • Citrus juicer or manual juicer

Having the right tools makes making tuna ceviche fun and rewarding. With these kitchen tools, you can create a tasty and fresh dish. It’s perfect for any event.

Selecting the Perfect Tuna for Your Ceviche

Choosing the right tuna is key to a tasty ceviche. A good tuna selection can greatly improve the dish’s flavor and texture. Fresh tuna is ideal, but frozen seafood can also work if it’s stored right.

For top seafood quality, pick tuna that’s firm, has a vibrant color, and smells nice. Also, check the packaging for any damage or tampering.

Fresh vs. Frozen Tuna Options

Fresh tuna is the top choice, but frozen tuna is a good backup. Frozen tuna is often less expensive and lasts longer than fresh.

Quality Indicators to Look For

When picking tuna, look for these signs of quality:

  • Firm texture
  • Rich color
  • Pleasant smell

Best Tuna Varieties for Ceviche

Yellowfin, bluefin, and albacore are the best tuna for ceviche. They have a rich taste and firm texture that stands up to the citrus marinade.

Fresh Ingredients That Make Your Tuna Ceviche Shine

To make a great tuna ceviche, focus on the quality of your ingredients. Citrus fruits like lemons, limes, and oranges are key. They add freshness and help “cure” the tuna, making it safe to eat.

Other ingredients like onions, peppers, and cilantro can also improve the dish. For a spicy touch, add hot sauce or sliced jalapenos. The goal is to mix flavors and textures for a refreshing dish.

Some important ceviche ingredients to think about are:

  • Fresh citrus fruits, such as limes and lemons
  • Onions and peppers for added flavor and texture
  • Cilantro for a fresh and herbal note
  • Hot sauce or jalapenos for an extra kick

Using these fresh ingredients with high-quality tuna will make a standout ceviche. The freshness and quality of the ingredients are crucial for the dish’s flavor and texture.

Step-by-Step Tuna Ceviche Preparation Method

To make tuna ceviche, you must follow seafood safety rules for a tasty and safe dish. Start by cutting the tuna into small pieces and putting them in a bowl.

Then, mix lemon and lime juices with chopped onions, peppers, and cilantro. This mix will “cook” the tuna and add flavor.

Preparing the Tuna

When working with raw tuna, keeping it safe is key. Always store it in the fridge at 40°F (4°C) or lower. This is before and after you marinate it.

Mixing the Citrus Base

The citrus base is vital for ceviche preparation. It adds the acidity needed to “cook” the tuna. Mix lemon and lime juices with onions, peppers, and cilantro.

Combining Additional Ingredients

After preparing the tuna and citrus base, mix them together. Add ingredients like diced mango or avocado. This is your chance to add your favorite flavors.

Proper Marination Techniques

Finally, use the right marination techniques to blend the flavors. Marinate the tuna in the fridge for at least 30 minutes. Always keep seafood safety in mind during this step.

Safety Tips for Handling Raw Tuna

Handling raw fish, like seafood safety, is very important. Raw tuna needs special care to avoid getting sick. Always use clean hands when handling the fish. Make sure to wash your hands well before and after touching the fish.

Storing raw tuna in a sealed container in the fridge is key. This stops the spread of germs and keeps the fish fresh. Always check the fish for any signs of spoilage before eating it. Spoiled fish can be very dangerous. Following these steps helps keep you safe when eating raw fish.

Here are some important tips for handling raw tuna:

  • Always buy fish from a trusted source
  • Keep fish in a sealed container at 40°F (4°C) or below
  • Eat fish within a day or two of buying it
  • Keep raw fish away from other foods to avoid contamination

By following these seafood safety tips and handling food right, you can enjoy raw tuna safely. Remember, handling raw fish needs care and attention to keep your meal safe and tasty.

seafood safety

Regional Variations of Traditional Tuna Ceviche

Tuna ceviche is loved in many parts of Latin America and beyond. The ceviche variations show the creativity and richness of Latin American cuisine. Each place adds its own twist to this refreshing seafood recipe.

In Mexico, tuna ceviche is made with raw fish, lime juice, onions, peppers, and cilantro. It’s a favorite in many Mexican restaurants. In Peru, ceviche is a national dish, with fresh seafood, citrus juices, and aji amarillo peppers.

Mexican-Style Tuna Ceviche

  • Marinated in lime juice with onions and peppers
  • Mixed with cilantro and served with tortilla chips
  • A refreshing and spicy twist on traditional ceviche

Peruvian-Inspired Variations

  • Featuring fresh seafood and citrus juices
  • Spiced with aji amarillo peppers for added heat
  • A bold and flavorful take on traditional ceviche

Hawaiian Poke-Style Adaptation

This version of tuna ceviche uses raw fish, soy sauce, and sesame oil. It has a unique and delicious flavor. The mix of Asian and Latin American flavors makes it a standout seafood recipe.

Perfect Pairings and Serving Suggestions

Serving tuna ceviche right can make it even better. You have many options to make it special for your guests. Choose from seafood, drinks, or how to present it to make it stand out.

Traditional Accompaniments

Popular choices for ceviche include tortilla chips, tostadas, and toasted bread. They add a nice crunch and don’t overpower the tuna’s taste. For a bigger meal, try it with grilled shrimp or scallops.

ceviche pairings

Beverage Pairings

Drinks can enhance the ceviche’s taste. Margaritas, white wine, and lime-infused sparkling water are great choices. For something sweeter, try pineapple or grapefruit juice.

Plating Techniques

How you present the dish matters a lot. Use fresh herbs, flowers, and garnishes for color. Try different patterns or towers to make it creative. Good presentation makes the meal memorable.

Troubleshooting Common Tuna Ceviche Mistakes

When making tuna ceviche, knowing common mistakes is key. One big error is over-marinating the fish, making it mushy. To fix this, follow seafood preparation tips and marinate for the right time.

Another mistake is using bad ingredients, like old or spoiled fish. Always pick fresh, high-quality stuff for the best taste and texture. Here are some kitchen tips to steer clear of ceviche mistakes:

  • Use sashimi-grade tuna for safety and quality.
  • Marinate in lemon and lime juices for the right time.
  • Handle the fish gently to keep it from getting mushy.

By following these tips and watching out for ceviche mistakes, you can make a tasty and safe tuna ceviche. Always put seafood preparation

Storage and Make-Ahead Tips

Storing tuna ceviche right is key for food safety. Keep it in a sealed container in the fridge for a day or two. This stops bacteria and keeps you safe from food illness.

Want to prep ceviche early? You can make the parts and store them in the fridge until ready. This saves time and still gives you a tasty meal. Here are some make-ahead tips:

  • Make the citrus mix and keep it in the fridge for up to a day
  • Chop onions, peppers, and more, and store them in airtight containers
  • Put the ceviche together just before eating for the best taste and texture

Reheating ceviche? Heat it to 145°F (63°C) for food safety. You can microwave or cook it on the stovetop. But don’t overcook the fish. Follow these seafood storage and make-ahead tips for a safe and tasty tuna ceviche.

Conclusion: Mastering Your Homemade Tuna Ceviche

Now you’re ready to make amazing homemade ceviche. The secret is using fresh, quality ingredients and following food safety rules. Feel free to try new flavors and ingredients to make your ceviche special.

With practice, you’ll become a ceviche expert. Your friends and family will love your homemade tuna ceviche. Serve it beautifully and pair it with drinks for a memorable meal. Enjoy your new skill and the delicious flavors of ceviche.

Tagged : / / / / / / /

Best Thin Steak Recipes for Quick and Easy Meals

Ever had those crazy weeknights when you’re starving but have no time to cook? Thin steak recipes are here to save the day. They can be ready in just 10 to 50 minutes, making dinner a breeze.

Thin steaks are not just quick; they’re also incredibly tasty. They’re perfect for anyone, whether you’re a busy pro or a home cook looking for simple steak dishes. You’ll find recipes for everything from New York strip to flank steak, all easy to make and delicious.

Ready to add some flavor to your meals without spending hours cooking? Our thin steak recipes will change how you make dinner. They prove that you can have a tasty meal in no time.

Understanding Different Cuts of Thin Steak

Exploring lean steak dishes starts with knowing the different cuts. Thin steaks are versatile and cook quickly. They’re great for busy cooks who want to make tasty meals fast.

Choosing the right cut is key for delicious flank and skirt steak recipes. Each cut has its own flavor and cooking needs.

Flank Steak: A Lean Culinary Powerhouse

Flank steak is a lean cut with great flavor. It comes from the cow’s belly, offering a strong beef taste. It’s perfect for marinating and quick cooking.

  • Extremely lean muscle structure
  • Intense beef flavor
  • Best when marinated for 8-12 hours
  • Ideal for grilling or quick searing

Skirt Steak: Rich Flavor Profile

Skirt steak has a rich, beefy taste. It’s a favorite among chefs for its texture and flavor absorption. Here are some tips:

  • Two varieties: outside and inside skirt
  • Outside skirt is more tender
  • Excellent for fast cooking methods
  • Perfect for stir-fries and fajitas

Top Sirloin: Balanced Tenderness

Top sirloin is a balanced choice for leaner cuts. It’s versatile and flavorful. Here’s how to choose:

  1. Look for moderate marbling
  2. Choose cuts with consistent thickness
  3. Aim for bright red coloration
  4. Select steaks with minimal connective tissue

Essential Tips for Cooking Perfect Thin Steak

Learning to cook thin steak is key to making great grilled and pan-seared steaks. Thin steaks cook fast and can get tough if not done right. Your aim is to get a steak that’s tender and tastes amazing, making healthy red meat meals a pleasure.

Getting your steak ready is the first step to cooking it perfectly. Here are some important tips:

  • Pat the steak dry before cooking to ensure proper browning
  • Bring meat to room temperature before cooking
  • Season generously with salt and pepper
  • Use high heat for quick searing

For the best pan-seared steak, use a cast-iron skillet heated to at least 400 degrees. Thin steaks need only 1-2 minutes per side to be just right. Keep the heat high and don’t overcrowd the pan.

When cooking healthy red meat meals, remember these temperature tips:

  1. Rare: 115-120°F
  2. Medium-rare: 120-125°F
  3. Medium: 130-135°F

For grilled steak, let the meat rest for 5 minutes after cooking. This helps the inside stay juicy and flavorful. With these tips, you can make thin steaks into top-notch meals at home.

Quick Asian-Inspired Thin Steak Recipes

Make your weeknight dinners exciting with these Asian-inspired thin steak recipes. They promise delicious meals in under 30 minutes. These recipes are not only quick but also bring exciting flavors to your table.

Mongolian Beef with Garlic Sauce

This Mongolian beef dish is a restaurant-quality thin steak recipe that’s easy to make. It combines tender beef with a rich garlic sauce. This dish makes 4 servings with just 1.5 pounds of shaved steak.

  • Total preparation time: 25 minutes
  • Nutritional highlights per serving:
    • Calories: 445 kcal
    • Protein: 20.9g
    • Carbohydrates: 18.86g

Korean Bulgogi Bowl

Want authentic Korean flavors? This thin steak recipe turns ordinary beef into a succulent bulgogi bowl. Marinate your steak in a mix of soy sauce, brown sugar, and aromatics. It’s a sweet and savory dish perfect for quick dinners.

  • Recommended serving: Over hot rice
  • Nutritional profile per serving:
    • Calories: 379 kcal
    • Protein: 26g
    • Carbohydrates: 48g

Shaved Steak Stir Fry

This 20-minute stir fry is a game-changer for low-fat beef recipes. It’s packed with fresh vegetables and lean shaved steak. It’s a nutritious and delicious meal that you can customize to your liking. The key is quick cooking and a flavorful sauce.

  • Vegetable mix suggestion: 6 cups of mixed vegetables
  • Beef to vegetable ratio: 3/4 pound beef to 3 cups vegetables
  • Nutritional benefits per serving:
    • Calories: 377 kcal
    • Protein: 26g
    • Total fat: 26g

These thin steak recipes show that healthy, flavorful meals can be quick and easy. Try these Asian-inspired dishes and add excitement to your dinner table!

Mediterranean-Style Thin Steak Dishes

Turn your thin steak recipes into a Mediterranean journey. These healthy meals bring bright flavors and simple cooking to your table. With a few ingredients, you can make easy steak dishes that feel like a trip to Greece, Italy, and Spain.

Mediterranean cooking makes thin steaks special. It uses fresh ingredients and light cooking to keep flavors true. Here are some key tips for tasty Mediterranean-style steak dishes:

  • Use high-quality olive oil for marinating
  • Incorporate fresh herbs like oregano and rosemary
  • Add citrus elements for brightness
  • Pair with fresh vegetables and light sides

Try a Mediterranean stuffed flank steak with spinach, mozzarella, and sun-dried tomatoes. It’s full of flavor and healthy. You’ll need a 1.5-pound flank steak, marinated for 2-24 hours for tenderness and taste.

Cook your steak to medium-rare at 135°F for juiciness. Let it rest for 10 minutes to keep flavors in. Serve with Greek salad or lemon orzo for a full meal.

Cooking thin steaks is easy and fun. These recipes are great for beginners who want to make quick, tasty dinners. Thin steak recipes let you enjoy restaurant-quality meals at home.

Let’s look at some easy recipes to help you cook thin steaks like a pro:

Garlic Butter Brazilian Steak

This dish is simple and quick to make. It’s perfect for a busy weeknight. Here’s how to make it:

  • Use high-quality thin steak cut
  • Create a rich garlic butter sauce
  • Sear quickly over high heat

Simple Pan-Seared Steak Technique

Learning to pan-sear is key for tender, juicy steaks. Here’s what to do:

  1. Pat the steak dry with paper towels
  2. Season generously with salt and pepper
  3. Use a hot skillet with a touch of oil
  4. Cook for just 1-2 minutes per side

Basic Marinade Techniques

Marinades can make your steak amazing. Pro tip: Use about ¼ to ½ cup of marinade per pound of steak. A basic marinade includes:

  • Acidic component (vinegar or citrus juice)
  • Oil
  • Herbs and spices
  • Garlic or onion for depth of flavor

Remember, thin steaks cook fast – usually under 5 minutes. Keep an eye on them to avoid overcooking and keep them juicy.

Creative Stuffed and Rolled Thin Steak Ideas

Stuffed Flank Steak Recipes

Turn your thin steak recipes into amazing dishes with creative stuffing and rolling. Lean steak dishes become special when you try new fillings. These fillings make simple ingredients taste like they’re from a restaurant.

Stuffed flank steak is a fun way to make ordinary meat into a tasty dinner. Your choices are endless. Here are some tasty ideas:

  • Spinach and mozzarella pinwheel steak
  • Prosciutto and provolone rolled steak
  • Mediterranean-inspired sun-dried tomato and herb stuffed steak

When making thin steak recipes, butterflying is crucial. Gently slice the steak horizontally, keeping it attached on one side. This lets you fill it more. Chefs say to use kitchen twine or toothpicks to keep the shape while cooking.

Cooking methods are important for these delicate dishes. You can:

  1. Oven-roast at 350°F
  2. Grill at 400°F
  3. Pan-sear and finish in the oven

Pro tip: Always let your stuffed steak rest for 10 minutes after cooking. This makes it juicy and tender. With these tips, you’ll make simple lean steak dishes into impressive meals. They’re great for any time, from weeknight dinners to special occasions.

Healthy Low-Carb Thin Steak Meals

Making lean steak dishes healthy and low-carb is easy. You can enjoy protein-rich meals that are both tasty and simple to make. This is great for those who watch their diet.

Creating low-fat beef recipes is all about using quality ingredients and smart cooking. Thin steaks are perfect for quick, nutritious meals. They help keep your diet on track.

Steak and Vegetable Stir-Fry

A great lean steak dish is a quick stir-fry. It combines protein and veggies in one tasty meal. Here’s a fast and healthy recipe:

  • Prep time: 10 minutes
  • Cooking time: 10 minutes
  • Total servings: 4
  • Calories per serving: 297

To make it, slice thin steak into strips and stir-fry with asparagus and green onions. It’s ready in just 20 minutes. It’s perfect for busy weeknights.

Protein-Rich Steak Salads

Steak salads are another great way to enjoy healthy red meat meals. They mix thinly sliced steak with fresh greens and colorful veggies. This makes for a meal full of nutrients.

  • Recommended cuts: Top sirloin, flank steak
  • Protein content: Approximately 26g per serving
  • Carbohydrates: Just 5g per serving

Choosing lean cuts and adding crisp veggies makes for a delicious meal. It supports your health and fitness goals.

Best Marinades and Sauces for Thin Steaks

Improving your thin steak recipes starts with mastering marinades and sauces. Learning the right techniques can make your easy steak dishes taste like they’re from a restaurant. This will surely impress your family and friends.

Steak Marinade Preparation

Timing is key when making marinades for thin steaks. The marinating time can vary from 30 minutes to 8 hours, depending on the steak type. Thinner cuts like skirt and flank steaks usually need 2-4 hours. But tougher cuts do better with an 8-hour marinating session.

  • Quick marinade ingredients:
    • Olive oil
    • Worcestershire sauce
    • Soy sauce
    • Lemon juice
    • Garlic powder

Pro tip: Always boil leftover marinade for 5 minutes to kill bacteria. This makes your steak dishes safe and flavorful.

Different marinades suit different steak cuts. Cheaper cuts like top round and flank steak soak up flavors well. But pricier cuts like filet mignon need less seasoning because they’re naturally tender.

  • Top marinade flavor profiles:
    • Asian-inspired soy-ginger blend
    • Mediterranean herb and lemon
    • Spicy chipotle lime
    • Balsamic-rosemary

A great marinade can make an ordinary steak unforgettable. Try out different flavors to find your favorite for quick and tasty steak dinners.

Conclusion

Your journey into thin steak recipes has opened up a world of flavors. These quick meals are both tasty and healthy, proving that you don’t need to spend hours cooking. With cooking times from 2-30 minutes, they’re ideal for those with busy schedules.

Thin steak recipes are incredibly versatile, from Asian stir-fries to Mediterranean dishes. They can be grilled or seared, offering about 28 grams of protein per serving. The secret is knowing how to cook each cut right.

Success with thin steaks comes from proper preparation and cooking. Learn about quick marinades, temperature control, and knowing when they’re done. This way, you can make them taste like they came from a restaurant. Try out different flavors and cooking methods to find your favorites.

Keep exploring the world of thin steaks. They’re not just food; they’re a chance to try new flavors, get better at cooking, and enjoy healthy meals fast.

Tagged : / / /

How to Make the Best Apple Spice Cake Recipe at Home

As autumn leaves dance outside and crisp breezes whisper promises of comfort, there’s something magical about creating a homemade apple spice cake. It transforms your kitchen into a warm sanctuary of delicious memories. This fall dessert isn’t just a recipe—it’s an experience that connects you to generations of home bakers.

The apple spice cake recipe we’ll explore today is more than just a dessert. It’s a celebration of fall’s bounty, combining fresh apples, warming spices, and a luscious cream cheese frosting. Each slice tells a story of tradition, comfort, and the simple pleasure of baking something extraordinary.

Whether you’re a seasoned baker or a curious kitchen novice, this recipe will guide you through creating a moist, flavorful cake. It captures the essence of autumn in every single bite. Get ready to fill your home with the irresistible aroma of cinnamon, ginger, and freshly baked goodness.

Understanding the Magic of Apple Spice Cake

Apple spice cake is a top pick for cozy autumn treats. It turns simple parts into a tasty dessert that warms your heart and taste buds. This recipe is a true fall favorite, mixing cinnamon apples with warm spices.

What Makes This Cake Extraordinary

This apple spice cake is special because it mixes textures and tastes in a unique way. It has:

  • Incredibly moist cake layers
  • Intense warm spice profile
  • Perfect balance of sweet and tart flavors
  • Versatile serving options

Key Flavor Components

To make the perfect apple spice cake, you need to know how each ingredient works together. Cinnamon apples add a sweet base. Nutmeg and ginger add depth and complexity.

Why Home Bakers Love This Recipe

Home bakers love this recipe because it’s easy yet impressive. With basic ingredients and simple steps, you can make a dessert that looks and tastes like it came from a bakery. You can also add your own touches, making each cake a special fall treat.

Essential Ingredients for Apple Spice Cake Recipe

Starting with the right ingredients is key to making moist cakes from scratch. Your apple spice cake needs a mix of ingredients that blend together for a unique taste.

Here’s what you’ll need for the best apple spice cake:

  • 1 1/2 cups all-purpose flour
  • 1 teaspoon baking powder
  • 3/4 teaspoon baking soda
  • 1/4 teaspoon kosher salt
  • 1/2 teaspoon ground cloves
  • 1/4 teaspoon ground nutmeg
  • 1/2 cup granulated sugar
  • 1/2 cup packed light brown sugar
  • 3 large eggs (room temperature)
  • 6 tablespoons vegetable oil
  • 1 1/2 cups grated Fuji apples
  • 1 1/2 teaspoons vanilla extract

Choosing quality ingredients is vital when baking from scratch. Honeycrisp apples add a perfect mix of sweet and tart. The blend of white and brown sugars gives the cake a deep, rich taste.

Pro tip: Use room temperature ingredients for better mixing and texture. Fresh spices like nutmeg and cloves will give a stronger aroma than older spices.

Every ingredient is important for a moist, tasty apple spice cake. Choosing fresh, high-quality ingredients is the first step to baking success.

Kitchen Tools and Equipment Needed

Getting ready for holiday baking means having the right tools. Whether you’re an experienced baker or new to easy cake recipes, the right equipment makes apple spice cake prep fun and easy.

Essential Baking Pans

  • Two 8×3 inch round cake pans
  • 9×13 inch rectangular baking pan (alternative option)
  • Non-stick baking sheets
  • Silicone baking mats for easy cleanup

Mixing and Measuring Tools

  • Electric stand mixer or hand mixer
  • Digital kitchen scale
  • Measuring cups and spoons
  • Rubber spatula
  • Whisk
  • Large mixing bowls

Optional Decorating Equipment

  • Cake leveler
  • Offset spatula
  • Piping bags and tips
  • Cake turntable

Studies show 75% of home bakers think quality tools make baking better. Good equipment lets you bake delicious holiday treats with confidence.

Selecting and Preparing the Perfect Apples

Best Apples for Fall Desserts

Choosing the right apples is key for tasty cinnamon apples in your fall desserts. Not all apples are the same for baking. The best ones will make your apple spice cake taste great and feel just right.

For your apple spice cake, consider these top apple varieties:

  • Royal Gala: Sweet and crisp
  • Honeycrisp: Keeps shape during baking
  • Jazz: Offers excellent flavor complexity
  • Granny Smith: Provides tartness and structure

When preparing your apples, follow these essential steps to ensure the best results:

  1. Wash apples thoroughly under cool water
  2. Use a vegetable peeler for safe and efficient peeling
  3. Grate apples using the large holes of a box grater
  4. Prevent browning by sprinkling lemon juice over grated apples

Pro tip: Pat grated apples dry with paper towels to prevent excess moisture in your fall desserts. This helps maintain the cake’s ideal texture and prevents a soggy bottom.

By selecting the right apples and preparing them carefully, you’ll create a mouthwatering cinnamon apples cake that captures the essence of autumn baking.

The Perfect Blend of Warming Spices

Making the ultimate apple spice cake is all about the spices. The right mix of spices turns a simple cake into a feast of autumn tastes. These flavors will make your mouth dance with joy.

Essential Spice Measurements

Your apple spice cake will stand out with the right spice mix. The magic happens with:

  • 2 teaspoons ground cinnamon
  • 3/4 teaspoon ground cloves
  • 1/2 teaspoon ground allspice
  • 1 teaspoon ground ginger

Balancing Flavors

Finding the perfect spice balance is key. Too much can be overpowering, while too little makes it bland. Start with these amounts and tweak to your liking. Aim for a mix where each spice gets its moment to shine.

Optional Spice Additions

Looking to take your spices to the next level? Try these:

  • Cardamom for exotic depth
  • Nutmeg for a warm touch
  • Orange zest for a bright note

Remember, fresh spices are essential for the best flavors. Keep your spices in airtight containers, away from heat and light. This will help them stay potent.

Step-by-Step Mixing Method

Apple Spice Cake Mixing Technique

Making from scratch cakes needs careful mixing for the right texture and taste. The secret to a tasty apple spice cake is in how you mix the ingredients. Begin by setting up two bowls: one for dry ingredients and another for wet ones.

Here are the key steps for mixing your cake batter:

  1. Sift together dry ingredients:
    • 1 ¾ cups all-purpose flour
    • 1 tsp baking powder
    • ¼ tsp baking soda
    • ½ tsp salt
    • 1 tbsp apple pie spice
  2. In a separate bowl, mix wet ingredients:
    • ½ cup melted vegan butter
    • ½ cup oil
    • ½ cup dairy-free yogurt
    • 1½ tbsp vanilla extract

The trick to great easy cake recipes is gentle mixing. Slowly add dry ingredients to wet ones, folding gently to prevent overmixing. Overmixing can make your cake tough and dense. Mix just until the ingredients are combined – a few small lumps are okay!

When making from scratch cakes, aim for a batter that’s smooth and consistent. It should fall easily from your spoon. The right mixing technique makes your cake light and tender, impressing everyone at the table.

Baking Temperature and Timing Guidelines

Getting your moist cake recipes just right means paying close attention to temperature and timing. Whether it’s for a holiday treat or a special dessert, knowing the right steps can make a big difference. This is especially true for making a delicious apple spice cake.

Getting your oven ready is key to the perfect cake texture. Here are some important tips to help you succeed:

Oven Preparation Tips

  • Preheat your oven to exactly 350°F (180°C)
  • Use an accurate oven thermometer to check the temperature
  • Put the cake rack in the oven’s center
  • Don’t open the oven door too often while baking

Testing for Doneness

Figuring out when your apple spice cake is done needs careful watching. Experts suggest using a few methods:

  1. Toothpick Test: Stick a clean toothpick into the cake’s center
    • If it comes out with a few moist crumbs, it’s ready
    • A clean toothpick means it’s overdone
  2. Visual Cues:
    • The cake should look golden brown
    • Edges should slightly pull away from the pan
  3. Gentle Touch: Press the cake’s center gently
    • It should spring back right away
    • No dent should stay

Most apple spice cakes take 30-33 minutes to bake. But remember, every oven is different. So, keep a close eye on your cake to get the moist texture you want in your holiday baking.

Creating the Cinnamon Cream Cheese Frosting

Make your festive baked goods even better with a tasty cinnamon cream cheese frosting. It’s filled with the cozy flavors of autumn. This frosting will take your apple spice cake to a whole new level of deliciousness.

To make the frosting, you’ll need a few important ingredients:

  • 2 Cups (452g) unsalted butter, softened
  • 7 Cups (840g) powdered sugar
  • 2 tsp ground cinnamon
  • 4 tsp pure vanilla extract
  • 3 Tbsp whole milk
  • 1/4 tsp salt

First, make sure your butter and cream cheese are soft. This step is key for a smooth frosting that spreads easily. Pro tip: Use an electric mixer to whip the butter until it’s light and fluffy. This makes a great base for your frosting.

Slowly add the powdered sugar, mixing on low speed. This prevents a mess in your kitchen. The cinnamon adds a warm, spicy flavor that goes perfectly with the apple spice cake. It’s a perfect mix of tastes that feels like autumn.

If the frosting is too thick, add milk a tablespoon at a time. For a lighter texture, beat it for another minute. You can keep this frosting in the fridge for up to two weeks. It’s great for preparing ahead of time for your festive treats.

Apple Filling Preparation Techniques

Making the perfect apple filling for fall desserts is all about the details. The right method can turn your cinnamon apples into something truly special. This will make your apple spice cake even better.

First, pick the best apples for your filling. Granny Smith and Honeycrisp apples are great choices. They offer a nice mix of tart and sweet. You’ll need about 2 cups of grated apples, which is roughly 2 medium fruits.

  • Grate apples using a box grater or food processor
  • Keep the apple skins on for added texture and nutrition
  • Squeeze out excess moisture to prevent watery filling

Here’s what you’ll need for the filling:

  1. Light brown sugar (½ cup)
  2. Ground cinnamon (2 teaspoons)
  3. Cornstarch (1 tablespoon)
  4. Lemon juice (1 tablespoon)
  5. Unsalted butter (2 tablespoons)

To cook the filling, use gentle heat and stir constantly. Cook it over medium heat until it thickens, which should take 3-5 minutes. You want it to be rich and glossy. This will make your fall desserts even more delicious. Let the filling cool down completely before adding it to your cake. This will prevent it from making the layers soggy.

Pro tip: Any leftover filling is great on pancakes, toast, or ice cream!

Professional Cake Assembly and Decoration Tips

Turning your apple spice cake into a stunning masterpiece needs skill and detail. Whether it’s for holiday baking or a special event, using professional assembly techniques can make your dessert stand out. It goes from simple to spectacular.

Creating a cake that looks professional involves key steps. These steps will make your dessert unforgettable. The right steps can turn a simple recipe into a culinary masterpiece.

Layering Techniques for Perfect Height

  • Use a long serrated knife to level cake layers evenly
  • Chill layers for 15-20 minutes before assembling to reduce crumbling
  • Place first layer on a sturdy cake board
  • Apply a thin, even layer of apple filling between each cake layer

Smooth Frosting Application Methods

Get a flawless finish with these frosting techniques:

  1. Start with a crumb coat to seal in loose cake particles
  2. Refrigerate cake for 15 minutes after crumb coating
  3. Apply final frosting layer using an offset spatula
  4. Use a bench scraper to achieve smooth, even sides

Final Decorative Touches

Add a creative touch to your cake. Try piping buttercream swirls, sprinkling cinnamon, or arranging apple slices around the base. It makes for an elegant look.

Your apple spice cake will be the star of any event. It shows off your baking skills and creativity.

Conclusion

Your apple spice cake recipe journey ends with a delicious treat. It’s filled with the cozy flavors of autumn. You’ve learned to make a dessert that will wow everyone.

This recipe shows baking can be easy and fun. You only need 55 minutes and simple ingredients. It’s all about following the recipe carefully and being patient.

Every apple spice cake you make will be special. Your own twist makes it unique. Enjoy baking and share your cake with family and friends. It’s a way to make lasting memories.

Don’t stop trying new things and stay inspired. Baking is a joy that turns simple ingredients into something amazing. It’s a celebration of autumn’s flavors.

Tagged : / /

Best Classic Tuna Tartare Recipe

Imagine turning your kitchen into a gourmet paradise with a top-notch tuna tartare. That first bite of silky, seasoned raw tuna can take you to culinary heaven. It’s more than a recipe; it’s an experience that blends simplicity with rich flavors.

Making the perfect tuna tartar is an art that needs passion, not many ingredients. With a few expert tips, you’ll make a dish that looks and tastes like a pro’s work. Get ready to wow your guests and boost your cooking skills with this classic tuna tartare recipe.

What is Tuna Tartare: Origins and History

Tuna tartare is a dish that brings together flavors from around the world. It started as a mix of French and Japanese cooking styles. This mix turned raw fish into a fancy dish to eat.

In the 1980s, California’s food scene was buzzing. Chefs mixed old ways of eating raw fish with new ideas. This led to tuna tartare, a dish that soon won hearts worldwide.

French and Japanese Culinary Fusion

French and Japanese cooking traditions merged to create tuna tartare. Chefs took the classic beef tartare and swapped it with tuna. This made the dish lighter and more refined.

  • Originated in Los Angeles restaurants
  • Inspired by traditional Japanese raw fish techniques
  • Adapted French tartare preparation methods

Evolution from Beef Tartare

Beef tartare got a new twist with tuna. Chefs found tuna’s flavor was smoother and more refined. This made it a hit with food lovers looking for something new.

Modern Restaurant Culture Impact

Tuna tartare became a big deal in fancy restaurants. It showed off new ways of cooking and mixing flavors. People started to try more raw fish dishes, thanks to tuna tartare.

Today, chefs all over the world are making their own versions of tuna tartare. They focus on using the best, freshest tuna. This keeps the dish exciting and fresh.

Essential Ingredients for Classic Tuna Tartare Recipe

Making the best tuna tartare begins with top-notch ingredients. Whether you’re making a classic version or trying avocado or spicy tuna, quality matters most.

The main ingredient is #1 sushi-grade tuna. It’s the heart of a great tartare. This tuna should be fresh, smell like the ocean, and look vibrant. It’s best to use super frozen tuna to keep it fresh and safe.

Key Ingredients for Exceptional Tuna Tartare

  • Fresh Sushi-Grade Tuna: 200g, diced into ¼-inch cubes
  • Soy Sauce: 1 tablespoon for umami depth
  • Sesame Oil: 1 teaspoon for nutty flavor
  • Lime Juice: 1 teaspoon for brightness
  • Green Onions: Finely chopped
  • Cilantro: Freshly chopped
  • Sriracha: Optional, for spicy tuna tartare

Pro tip: For avocado tuna tartare, add ripe avocado cubes for creaminess. Add extra sriracha for a spicy kick that excites your taste buds.

It’s all about finding the right balance of flavors. Let the tuna’s natural taste be the star. Each ingredient is important for a dish that’s both harmonious and unforgettable.

Selecting and Preparing Sushi-Grade Tuna

Making a great asian-inspired tuna tartare begins with top-notch fish. Knowing how to pick and handle sushi-grade tuna is key for taste and safety.

  • Translucent, bright red appearance
  • Shiny surface without discoloration
  • Firm texture with no soft spots
  • Fresh, clean ocean smell

Choosing Quality Tuna

Your tuna choice is crucial for your tartare. Sushi-grade tuna is flash-frozen to kill parasites and keep quality. Ahi tuna is a great pick, with about 25 grams of protein per 3-ounce serving.

Proper Fish Handling Techniques

Safe handling is essential when working with raw fish. Use clean cutting surfaces and sharp knives. Keep your tuna cold and work fast to keep it perfect. Cut the fish into precise ¼-inch dice for the best tartare texture.

Temperature and Storage Guidelines

Keep your sushi-grade tuna at 40°F or below. If it’s frozen, thaw it slowly in the fridge. Once ready, enjoy your tuna tartare within 24 hours for the best taste and safety.

  • Refrigerate immediately after preparation
  • Use within 24 hours
  • Keep below 40°F at all times

Essential Kitchen Tools and Equipment

Kitchen Tools for Tuna Tartare Preparation

To make the perfect citrus tuna tartare, you need more than just fresh ingredients. Your kitchen tools are key to creating a dish that will wow your guests.

A razor-sharp knife is the most important tool for your citrus tuna tartare. A good chef’s knife or santoku knife lets you cut the tuna with precision. A dull knife will ruin the fish’s texture and look.

  • Professional-grade chef’s knife
  • Cutting board (preferably wooden or plastic)
  • Sharp paring knife for detailed work
  • Mixing bowls in various sizes
  • Citrus juicer for fresh citrus elements
  • Measuring cups and spoons

For a fancy presentation of your citrus tuna tartare, think about these tools:

  1. Ring molds for perfect plating
  2. Microplane grater for zesting citrus
  3. Fine mesh strainer for removing excess liquid

Keeping your tools in top shape is crucial. Always clean and dry your knives right after use. Regular honing and sharpening will keep them sharp. These tools will turn fresh tuna into a beautiful dish.

Step-by-Step Preparation Method

Making the perfect sesame tuna tartare needs precision and skill. You aim to turn top-quality tuna into a tasty dish. It should have fresh flavors and look amazing.

Cutting and Dicing Techniques

Start by handling the tuna right. Put your sushi-grade tuna in the freezer for 30-60 minutes. This makes it firmer and easier to cut into clean, even cubes.

  • Use a sharp knife for precise cutting
  • Cut tuna into ¼-inch uniform cubes
  • Work on a cold, clean cutting surface
  • Maintain consistent cube size for even texture

Mixing and Seasoning Process

For a great sesame tuna tartare, seasoning is key. Mix the tuna gently to keep its texture soft.

  1. Combine diced tuna with sesame oil
  2. Add minced shallots
  3. Incorporate light soy sauce
  4. Sprinkle toasted sesame seeds

Plating Instructions

How you present your sesame tuna tartare makes a big difference. Use a ring mold for a fancy look or go for a rustic style.

  • Chill serving plates beforehand
  • Use fresh herbs as garnish
  • Drizzle additional sesame oil
  • Serve immediately after preparation

Pro tip: Add lemon juice and sea salt just before serving to prevent premature “cooking” of the tuna.

Classic Asian-Inspired Marinade Components

Making an authentic Asian-inspired tuna tartare is all about finding the right mix of flavors. The marinade is key to turning fresh fish into a dish that wows everyone.

Asian-Inspired Tuna Tartare Marinade

Your spicy tuna tartare starts with a marinade made from traditional Asian ingredients. Here are the main parts to make a flavor that will be remembered:

  • Soy Sauce: 2 tablespoons for depth and umami
  • Lime juice: 1 tablespoon for brightness
  • Sesame oil: 3 drops for nutty undertones
  • Fresh ginger: Finely minced for a zesty kick
  • Sriracha or chili paste: 1-2 teaspoons for heat in spicy tuna tartare

The secret to a great Asian-inspired tuna tartare is balancing these ingredients well. Use 200 grams of fresh, high-quality sashimi-grade tuna as the base. Let the marinade sit in the fridge for 5-10 minutes to blend the flavors.

If you like it spicy, add more sriracha or chili paste. But remember, the goal is to add flavor without hiding the tuna’s taste.

  • Pro tip: Use only sashimi-grade tuna for raw preparations
  • Adjust seasonings to your personal taste preference
  • Chill ingredients for 10-15 minutes before preparation for optimal texture

Your homemade Asian-inspired tuna tartare will have a perfect mix of flavors. It will impress anyone who tries it.

Serving Suggestions and Accompaniments

Make your citrus tuna tartare stand out with creative serving ideas. These will wow your guests and excite their taste buds. The right sides can turn a simple dish into a work of art.

Traditional Garnishes

Your avocado tuna tartare looks best with the right garnish. Here are some classic choices:

  • Finely chopped chives
  • Microgreens
  • Toasted sesame seeds
  • Thin radish slices
  • Crispy shallots

Complementary Side Dishes

Match your tuna tartare with these tasty sides. They bring out its delicate flavor:

  1. Grilled asparagus
  2. Mango salsa
  3. Quinoa salad
  4. Cucumber salad
  5. Edamame

Wine Pairing Recommendations

Choose a crisp white wine to go with your citrus tuna tartare. Sauvignon Blanc from New Zealand is a great choice. It has the right mix of acidity and freshness. You can also try:

  • Pinot Grigio
  • Dry Riesling
  • Sparkling rosé

When serving your avocado tuna tartare, think about using different bases. Try crostini, cucumber rounds, or wonton crisps. They add texture and make it look great.

Tips for Perfect Texture and Flavor Balance

To make the perfect classic tuna tartare, you need to be precise. Start by making sure your tuna is very cold. Freezing it for about 30 minutes helps with cutting and keeps the texture right.

Seasoning is key for flavor balance. Use just a little salt and pepper, about 1/4 teaspoon each. This lets the tuna’s natural taste shine without being too much. Adding 2 tablespoons of chives and 2 tablespoons of olive oil can make your dish stand out.

How you present your dish is as important as how it tastes. Chill your plates before serving to keep the tartare at the best temperature. For a fancy look, use a ring mold. And don’t forget, ruffle-style potato chips are a great side that stay crispy for about an hour.

Timing is crucial with this dish. Serve your tuna tartare within 24 hours of making it. And don’t let it sit out for too long. Follow these tips to impress everyone with your raw tuna appetizer.

Tagged : / / /

How to Cook Corn Dogs in Air Fryer – Step-by-step guide for perfect crispy results.

Imagine a crispy, golden-brown corn dog, cooked to perfection without deep frying. Your air fryer is about to become your new best friend. It will help you make delicious corn dogs in air fryer recipes that will make your taste buds dance with joy.

Air frying corn dogs is more than just a cooking method. It’s a game-changer for quick and delicious meals. Whether you’re hosting a game day party or need a fast lunch option, the air fryer corn dog recipe is healthier and more convenient than traditional methods.

Say goodbye to greasy, unevenly cooked corn dogs. With the right technique, you can get restaurant-quality results right in your kitchen. This guide will show you how to prepare mouthwatering corn dogs using your air fryer.

Benefits of Air Frying Corn Dogs

Cooking corn dogs in an air fryer is healthier and easier. It’s a new way to make air fryer frozen corn dogs. This method has many benefits.

Healthier Cooking Method

  • Reduces oil consumption by up to 75%
  • Significantly lowers calorie intake
  • Minimizes fat absorption during cooking
  • Provides a nutritionally smarter alternative to deep frying

Air fryers use little oil, so you can enjoy corn dogs without losing health benefits. Deep frying adds too much grease. Air frying uses hot air to make food crispy.

Time and Energy Efficient

  • Preheats in just 3-5 minutes
  • Cooks corn dogs faster than conventional ovens
  • Reduces overall kitchen energy consumption
  • Provides quick meal preparation

Air fryers cook food almost twice as fast as ovens. Corn dogs are ready in 8-10 minutes. That’s much quicker than the 30 minutes in an oven.

Perfect Crispy Texture

  • Achieves golden-brown exterior
  • Maintains juicy interior
  • Ensures consistent cooking
  • Creates restaurant-quality results at home

The air fryer’s fast air circulation makes corn dogs crispy every time. You get that crunchy texture without too much oil. It’s tasty and guilt-free.

Essential Equipment and Ingredients Needed

To make easy air fryer corn dogs, you need a few basic things. Before you begin, make sure you have these tools and ingredients. This will help you get a tasty and crispy dish.

Equipment You’ll Need

  • Air fryer (most models work perfectly for corn dogs)
  • Olive oil spray
  • Tongs for handling
  • Cooking timer

Your air fryer is the key to making air fried corn dogs. Most air fryers can cook 3-4 corn dogs at once. Make sure your air fryer has adjustable temperature settings for the best taste.

Corn Dog Varieties

  • Frozen corn dogs (most convenient)
  • Homemade corn dogs
  • Mini corn dogs
  • Vegetarian or gluten-free options

When picking corn dogs, look for brands like State Fair, Bar S, or Johnsonville. For those with dietary restrictions, try Foster Farms gluten-free or Morning Star plant-based options.

Optional Extras

  • Dipping sauces (ketchup, mustard)
  • Seasoning sprays
  • Paper towels for draining

With these tools and ingredients, you’re all set to make tasty air fried corn dogs. They’re crispy, quick, and simple to make!

Preparing Your Air Fryer for Corn Dogs

To make crispy air fryer corn dogs, you need to prepare well. The right air fryer setup is key for that golden-brown look. The best air fryer for corn dogs turns frozen treats into tasty snacks easily.

Temperature Settings

Getting the temperature right is essential for crispy corn dogs. Heat your air fryer to 375°F for even cooking. Corn dogs usually cook best at 360-390°F, depending on your air fryer.

Proper Basket Arrangement

  • Place corn dogs in a single layer
  • Make sure there’s space between each one
  • Don’t overcrowd the basket
  • Ensure air can circulate well

Oil Spray Guidelines

A little oil spray can make your corn dogs crisper. Here’s how to do it:

  1. Use just a bit of cooking spray
  2. Lightly spray corn dogs before cooking
  3. Choose oils with a high smoke point like canola or vegetable oil
  4. Rotate or shake the basket halfway through cooking

Pro tip: For the best results, get a quality air fryer with even heat and accurate temperature control.

Corn Dogs in Air Fryer: Basic Cooking Method

Air Fryer Corn Dogs Cooking Method

Cooking corn dogs in an air fryer is quick and easy. It’s perfect for a tasty, convenient meal. You’ll find it simple to make these golden treats.

To start your corn dogs in air fryer adventure, follow these key steps:

  • Preheat the air fryer to 400°F
  • Arrange corn dogs in a single layer
  • Leave at least 1/2 inch of space between each corn dog
  • Cook frozen corn dogs for 8-10 minutes
  • Flip corn dogs halfway through cooking

The cooking time depends on whether your corn dogs are frozen or thawed. Frozen corn dogs typically require 8-10 minutes. Thawed ones might need less. Always check the internal temperature reaches 165°F for safety.

Pro tip: For the crispiest results, avoid overcrowding the air fryer basket. This ensures even hot air circulation, giving you that perfect golden-brown exterior.

Remember to check your corn dogs often to avoid overcooking. Aim for a crispy outside and a hot, fully cooked inside.

Time and Temperature Guidelines for Perfect Results

Cooking corn dogs in an air fryer needs precision. You want a crispy outside and a hot inside. Knowing the right time and temperature is key.

Air frying corn dogs is not a one-size-fits-all job. Different things affect cooking times and temperatures. This ensures your air fryer frozen corn dogs always taste great.

Frozen vs Thawed Cooking Times

Cooking times for corn dogs in an air fryer change based on their state:

  • Frozen corn dogs: 10-15 minutes at 375°F
  • Thawed corn dogs: 8-10 minutes at 375°F
  • Pro tip: Always check the internal temperature reaches 165°F for safety

Size-Based Cooking Adjustments

The size of corn dogs affects cooking time. Mini corn dogs need:

  1. Frozen mini corn dogs: 6 minutes, then 5-7 minutes after turning
  2. Thawed mini corn dogs: 3-4 minutes per side
  3. Regular-sized corn dogs: Follow standard frozen/thawed times

Temperature Control Tips

Getting perfect results with air fryer corn dogs depends on keeping the temperature steady. Recommended settings are:

  • Standard temperature: 375°F (190°C)
  • Preheat your air fryer for 2-3 minutes before cooking
  • Avoid overcrowding the basket for even cooking

By following these tips, you’ll get great air fryer frozen corn dogs. They’ll have a crispy outside and a hot center.

Best Practices for Even Cooking and Crispiness

Crispy Air Fryer Corn Dogs Cooking Techniques

To make the perfect crispy air fryer corn dogs, you need some smart tips. The secret to great results is knowing how to get even cooking and crispiness in your air fryer.

Here are the key tips to get your easy air fryer corn dogs golden and crispy:

  • Leave at least 1/2 inch of space between corn dogs in the basket
  • Preheat the air fryer to 400°F for optimal cooking conditions
  • Lightly spray corn dogs with cooking oil to enhance crispiness
  • Shake the basket or flip corn dogs halfway through cooking

Spacing is key for crispy air fryer corn dogs. If you overcrowd, hot air can’t get around, leading to soggy, uneven corn dogs. With enough space, you get a crunchy outside and a hot inside.

The shake and flip technique is a big help for even browning. Around the 3-4 minute mark, shake your air fryer basket or flip the corn dogs. This ensures all sides get that golden-brown crispness.

Cook your corn dogs at 380-400°F for 6-8 minutes. Always check the internal temperature reaches 160°F for safety. With these tips, you’ll make deliciously crispy air fryer corn dogs every time!

Delicious Dipping Sauces and Pairings

Make your air fried corn dogs even better with tasty sauces and sides. These can turn a simple snack into a meal to remember. Whether you’re using the best air fryer or making a quick appetizer, the right pairings are key.

Classic Sauce Options

Every air fried corn dog needs a great dip. Here are some favorites:

  • Tangy yellow mustard
  • Classic ketchup
  • Creamy ranch dressing
  • Sweet honey mustard

Creative Sauce Combinations

Try new dipping sauces for a fun twist on air fried corn dogs:

  • Spicy sriracha mayo
  • Homemade barbecue sauce
  • Garlic aioli
  • Cheese dip with a hint of jalapeño

Perfect Side Dish Pairings

Complete your meal with these tasty sides:

  1. Crispy french fries
  2. Zucchini fries
  3. Mac and cheese
  4. Coleslaw
  5. Onion rings

Pro tip: Mix and match sauces and sides for the ultimate corn dog feast. Your taste buds will love it!

Storage and Reheating Tips

When storing your delicious corn dogs in air fryer, always use an airtight container. Refrigerate them promptly. They will stay fresh for 2-3 days at 40°F or lower. Keep them covered to prevent moisture loss and maintain their crispy exterior.

To reheat corn dogs in air fryer, set the temperature to 375°F and cook for 5-7 minutes. This method restores the original crispiness. It also ensures the internal temperature reaches 165°F for food safety. Avoid reheating corn dogs multiple times to prevent bacterial growth and texture compromise.

For longer-term storage, freeze your corn dogs in heavy-duty freezer bags. They can maintain quality for up to 2 months when wrapped correctly. When you’re ready to enjoy them, thaw in the refrigerator overnight. Then, reheat using your air fryer for the best results.

Always practice food safety by checking the internal temperature. Avoid leaving corn dogs at room temperature for more than 2 hours. With these storage and reheating tips, you’ll enjoy delicious, crispy corn dogs every time.

Tagged : / / / / / / / / /

Irresistible Slow cooker hamburger casserole: Tips, ingredients, and variations

Looking for a tasty and easy meal that everyone will love? The slow cooker hamburger casserole is your go-to. It turns simple ingredients into a delicious dish with little effort. It’s perfect for busy parents or anyone who loves to cook.

Slow cookers have changed the way we cook at home. With a few basic ingredients and a 6-quart slow cooker, you can make a satisfying meal. This dish is easy to make and can be customized in many ways.

Understanding the Appeal of Crockpot Ground Beef Casseroles

Looking for a tasty, one-pot meal that’s quick and feeds the whole family? Slow cooker ground beef casseroles are a hit for busy families. They offer a convenient and delicious dinner option.

Time-Saving Benefits of Slow Cooking

The beauty of an easy hamburger casserole is its simplicity and efficiency. Slow cooking makes it easy to prepare a big meal with little effort. By using a crockpot, you can:

  • Dump ingredients in the morning
  • Let the slow cooker work its magic
  • Return home to a fully prepared cheesy hamburger casserole
  • Spend less time in the kitchen

Why This Recipe Beats Boxed Hamburger Helper

Forget processed, high-sodium boxed meals. A homemade crockpot hamburger casserole lets you control what goes in. You can:

  • Reduce sodium content
  • Use high-quality, fresh ingredients
  • Customize flavors to your family’s taste
  • Avoid preservatives and artificial additives

Perfect Family Meal Solution

Your one-pot hamburger meal is more than just convenient. It’s packed with about 38g of protein per serving. The slow cooking adds rich, developed flavors, making it a nutritious and tasty dinner for all.

Pro tip: Pair your casserole with sides like Caesar salad, broccoli, or garlic bread for a complete meal!

Essential Ingredients for Your Slow Cooker Hamburger Casserole

Starting with the right ingredients is key to making tasty beef casserole recipes. For a hamburger casserole in your crock pot, choose top-notch ingredients. They should blend together to create a meal that’s both delicious and satisfying.

Here are the main ingredients you’ll need for a fantastic hamburger casserole:

  • Lean Ground Beef: 1.5 pounds of 85/15 ground beef (optimal fat content)
  • 1 small onion, finely diced
  • 2 cans (10 ounces each) of cream of mushroom soup
  • 1 cup of milk
  • 2 cups shredded Mexican cheese blend
  • 1 bag of frozen diced potatoes
  • Seasonings: garlic powder, salt, and pepper

Choosing the right ingredients is vital for your beef casserole. The lean ground beef adds protein, and the cream of mushroom soup makes the dish creamy. The frozen diced potatoes give it texture and bulk.

Pro tip for your hamburger casserole crock pot: Go for the best ingredients. Use fresh onions, full-fat cheese, and top-quality ground beef. This mix turns a simple meal into a hit with your family.

Don’t forget to thaw your potatoes before cooking. This ensures they cook evenly and add the right texture to your casserole. Your slow cooker will mix these ingredients into a comforting dish perfect for weeknights.

Step-by-Step Preparation Method

Making a tasty ground beef casserole in your crock pot is simple. Follow this guide to turn basic ingredients into a meal your family will enjoy.

Browning the Ground Beef

Begin by cooking your ground beef carefully. Heat a skillet over medium heat. Cook the beef for 7-10 minutes until it’s fully browned. Pro tip: Crumbling the meat helps it cook evenly. Also, drain any extra fat to keep the dish light and flavorful.

Combining Ingredients in the Crockpot

Here’s how to mix your crock pot hamburger helper:

  • Start with a layer of browned ground beef at the bottom
  • Add chopped onions and bell peppers on top
  • Pour in your favorite tomato sauce or cream-based sauce
  • Season with your favorite spices for extra taste

Timing and Temperature Guidelines

Here are the cooking times for your ground beef casserole:

  1. High setting: Cook for 2 hours
  2. Low setting: Cook for 3-4 hours
  3. Add pasta for the last 30 minutes
  4. Mix in cheese and sour cream just before serving

A standard slow cooker can handle 2-4 pounds of ground beef. This ensures even cooking and the best flavor in your casserole.

Tips for Perfect Texture and Consistency

Making the perfect easy hamburger casserole needs some special techniques. It’s all about getting the right texture and consistency. This comes from knowing how ingredients work together when slow cooking.

To get a creamy cheesy hamburger casserole, keep these tips in mind:

  • Save about 1/2 cup of cheese for the top to get a golden, melted look
  • Make sure there’s enough liquid so the pasta doesn’t dry out or get mushy
  • Use non-stick cooking spray in your slow cooker for easy cleaning
  • Stir the ingredients often to make sure the heat spreads evenly

Here are some tips to improve the texture of your casserole:

  1. Pick short pasta shapes like rotini or shells to keep the sauce inside
  2. Add veggies carefully to keep the casserole creamy
  3. Change the amount of liquid based on your pasta type
  4. Try different spices to match your taste

Pro tip: Let your casserole rest for 10-15 minutes after cooking. This lets the sauce thicken and the flavors blend together perfectly.

Creating the Perfect Cheese Sauce Base

Making a tasty cheesy hamburger casserole begins with a smooth, creamy cheese sauce. The right cheese blend and technique can make your slow cooker ground beef recipes stand out.

The cheese sauce is the heart of your beef casserole. Chefs say to pick high-quality cheeses that melt well and taste rich.

Choosing the Right Cheese Blend

For the best flavor and texture in your cheesy hamburger casserole, choose a mix of cheeses:

  • Sharp cheddar for bold taste
  • Mozzarella for smooth melting
  • Monterey Jack for creamy consistency
  • Avoid pre-shredded cheese as it contains anti-caking agents that prevent smooth melting

Preventing Sauce Separation

For a perfect cheese sauce, prepare carefully. Shred your cheese from a block for better melting. Here are some tips:

  1. Bring cheese to room temperature before adding
  2. Add cheese gradually while stirring
  3. Maintain consistent low heat
  4. Use cornstarch to stabilize the sauce if needed

Your slow cooker ground beef recipes will turn into a creamy, indulgent dish. It will be a hit with your family. Remember, patience and technique are key to a perfect cheese sauce base.

Nutritional Information and Portion Control

Slow Cooker Hamburger Casserole Nutrition

Your slow cooker hamburger casserole is not just tasty but also full of nutrients. Each serving is a balanced meal that fits into many diets. It’s a satisfying and healthy choice.

Here are the nutritional highlights of this crock pot hamburger casserole:

  • Calories: About 430 calories per serving
  • Protein: 33 grams – helps keep muscles strong
  • Carbohydrates: 62 grams – gives you energy
  • Fat: 8 grams, with only 3 grams saturated

It’s important to control your portions when eating this slow cooker hamburger casserole. The recipe makes six servings, great for family dinners or meal prep. Use a kitchen scale or measuring cup to keep serving sizes consistent.

For those watching their diet, here are some tips:

  1. Choose lean ground beef (93/7 ratio) to cut down on fat
  2. Add more veggies to boost fiber
  3. Use a standard measuring cup to control portion sizes

This casserole’s balanced nutrition makes it a great choice for a hearty yet healthy meal.

Creative Variations and Substitutions

Changing your easy hamburger casserole is easy. Beef casserole recipes are flexible. You can make them fit your taste and dietary needs.

Meat Alternatives

Try different proteins to make your casserole fresh. Here are some tasty options:

  • Ground turkey for a leaner option
  • Chicken with cream of chicken soup
  • Stew meat for a heartier texture
  • Plant-based meat substitutes for vegetarian diners

Pasta and Vegetable Enhancements

Make your one-pot hamburger meal better with new ingredients:

  • Replace traditional noodles with sliced potatoes or hashbrowns
  • Add extra vegetables like mushrooms, green peppers, or zucchini
  • Swap elbow macaroni for penne or rotini for varied texture

Dietary Modifications

Your easy hamburger casserole can meet different dietary needs:

  • Gluten-free: Use cornstarch instead of flour for thickening
  • Low-carb: Substitute pasta with cauliflower rice
  • Dairy-free: Choose plant-based cheese alternatives

Exploring these creative changes will keep your beef casserole recipes exciting. Everyone at the table will enjoy them.

Storage and Reheating Guidelines

Storing Hamburger Casserole Crock Pot Leftovers

Your delicious slow cooker ground beef recipes deserve proper storage. This keeps their flavor and quality. After making a cheesy hamburger casserole, follow these guidelines to keep your meal safe and tasty.

Refrigeration Best Practices

Put your hamburger casserole leftovers in an airtight container. The USDA says to keep cooked ground beef at 40°F or below. Your casserole will stay good for 3-4 days in the fridge.

Freezing Techniques

  • Cool the casserole completely before storing
  • Use freezer-safe containers or resealable bags
  • Label with the date of preparation
  • Freeze for up to 4 months

Reheating Tips

When reheating, make sure the casserole reaches 165°F. Pro tip: Add a splash of milk to keep it creamy.

Safe Thawing Methods

  1. Transfer frozen casserole to refrigerator 24 hours before serving
  2. Avoid thawing at room temperature
  3. Reheat in oven at 350°F until heated through

By following these tips, your cheesy hamburger casserole will stay safe, delicious, and ready to eat whenever you want!

Serving Suggestions and Accompaniments

Make your one-pot hamburger meal complete with the right sides. Choose sides that balance the rich flavors of your beef casserole. This way, you get a full and satisfying meal.

Here are some great side dish ideas to make your hamburger casserole even better:

  • Fresh Green Salads: A crisp mixed green salad with light vinaigrette cuts through the casserole’s richness
  • Roasted Vegetables: Broccoli, green beans, or asparagus provide nutritional balance
  • Garlic bread or crusty rolls for soaking up extra sauce
  • Quick cucumber salad with a tangy dressing

Looking for something different? Try these creative pairings to make your easy hamburger casserole stand out:

  1. Cilantro-lime rice (adds brightness)
  2. Quick quinoa salad with fresh herbs
  3. Roasted seasonal vegetables

Your slow cooker hamburger casserole is perfect for any occasion. Whether it’s a family dinner or a potluck, the right sides make it unforgettable.

Adapting the Recipe for Different Occasions

Your slow cooker hamburger casserole is perfect for any event. It’s great for family dinners or big potlucks. This ground beef casserole can be easily adjusted for any setting.

For small family meals, you can scale down the recipe. Here are some quick tips:

  • Reduce ingredient quantities proportionally
  • Adjust cooking time for smaller portions
  • Use smaller slow cooker settings

For bigger gatherings, try these ideas:

  1. Double the recipe ingredients
  2. Use a larger slow cooker
  3. Prepare additional toppings for customization

For holidays or special events, add seasonal touches. Try roasted autumn vegetables or festive herb blends. For potlucks, use a dish with a lid to keep it warm.

Meal trains and make-ahead options are great with this recipe. You can freeze parts for up to 3 months. This makes meal prep easy for busy families.

Conclusion

Your slow cooker ground beef recipes just got a big boost with this ultimate hamburger casserole crock pot method. This dish turns simple ingredients into a cozy meal that families will love.

Easy hamburger casserole techniques are perfect for busy cooks. You can change ingredients, meet dietary needs, or make a fast dinner. This recipe is all about flexibility and simplicity.

Cooking is about trying new things and having fun. Your slow cooker hamburger casserole is a chance to get creative. Try different flavors and ingredients to make it your own.

Mastering this recipe means more than just cooking a meal. It’s about creating special moments with your family. Enjoy the ease, flavors, and pride of serving a homemade dish that everyone will enjoy.

Tagged : / / / / /

What Makes Fresh Apple Cake Different ?

Imagine a homemade pastry that captures the essence of autumn in every bite. The fresh apple cake is a standout baked dessert. It turns simple ingredients into a culinary masterpiece. With chunks of tart Granny Smith apples and crunchy pecans, it offers an unmatched taste experience.

When you slice into a fresh apple cake, you find a moist interior. It’s packed with real fruit and warm spices. The cake’s texture comes from ingredients like shredded coconut, vanilla extract, and spices. Each bite tells a story of baking tradition and culinary craftsmanship.


The Origins and Heritage of Fresh Apple Cake

Fresh apple cake is a favorite treat in autumn, loved by many in America. It’s a recipe passed down through generations, filled with family stories and memories. Every slice brings warmth and connects us to our farming roots.

This classic recipe started in the United States’ fertile farmlands. Apple orchards were at the heart of family traditions. Families from all over made their own versions, turning a simple dessert into a cultural symbol.

Family Traditions and Recipe Evolution

Over time, apple cake recipes have changed, showing how tastes and ingredients have evolved. Families shared their recipes, making small changes along the way:

  • Adding local spices like nutmeg
  • Incorporating regional apple varieties
  • Trying out new baking methods

Historical Significance in American Baking

Apple cake is more than just a dessert. It connects us to our farming past. It shows how home baking kept cultural traditions alive and celebrated the harvest season.

Regional Variations Across the United States

Every region in the U.S. has its own apple cake style. From New England’s crisp apple cakes to the Midwest’s spiced treats, each place added its own twist to this beloved dessert.

Essential Ingredients That Set Fresh Apple Cake Apart

To make a memorable cinnamon-spiced cake, you need the right ingredients. These ingredients turn simple baking into a special treat. Your fresh apple cake starts with top-notch ingredients that come together to make a fantastic dessert.

The base of a great apple cake is high-quality apples. Choose 3 cups of tart apples, about 3 large ones. They add sweetness and texture, making the cake’s caramelized apples layer burst with flavor.

  • 2 cups all-purpose flour
  • 3/4 cup white granulated sugar
  • 2 teaspoons baking powder
  • 1/2 teaspoon kosher salt
  • 3 large eggs (room temperature)
  • 2 teaspoons pure vanilla extract

Spices are key in making your cinnamon-spiced cake stand out. Ground cinnamon and a bit of nutmeg give it a warm, inviting smell. Dark rum adds a sophisticated twist, making your cake unique.

Butter is also crucial, with 8 tablespoons of melted and cooled butter adding moisture. It mixes with eggs and vanilla extract to make a batter that’s smooth and rich. This ensures your cake is tender and delicious.

Choosing the right ingredients is more than following a recipe. It’s about creating a delightful experience that comforts you with every bite.

The Perfect Apples for Your Fresh Apple Cake

Choosing the right apples is key to making a delicious fresh apple cake. The right apples can turn a simple cake into a rustic tart that’s a treat for the senses.

Not all apples are the same when baking. Some apples are better for your cake, offering the perfect mix of sweetness and texture.

Best Apple Varieties for Baking

  • Granny Smith: Tart and firm, ideal for adding structure
  • Honeycrisp: Sweet with excellent holding shape
  • Pink Lady: Balanced flavor profile
  • Braeburn: Complex taste with natural spiciness
  • Jonagold: Provides rich, sweet undertones

Preparing Apples for the Perfect Texture

To get the best flavors, prepare your apples well. Peel and core them, then cut into half-inch cubes. This makes sure they cook evenly and keeps your cake from getting soggy.

Combining Different Apple Types for Enhanced Flavor

Experts say mixing apple types is best. Mixing tart Granny Smith with sweet Honeycrisp makes your cake taste amazing. It takes your fresh apple cake to a whole new level.

Use about 3½ to 4 cups of chopped apples for the right moisture and flavor in your cake.

The Science Behind Fresh Apple Cake’s Moisture

Unlocking the secret to a perfectly moist baked dessert requires understanding the intricate science behind moisture retention. Your homemade pastry’s exceptional texture comes from a delicate balance of ingredients and baking techniques.

The moisture magic in fresh apple cake stems from several key scientific principles:

  • Apples release natural juices during baking, infusing the cake with incredible moisture
  • Oil-based batters create a more tender crumb compared to butter-based recipes
  • Sugar acts as a moisture-trapping agent, keeping the cake soft and delectable

Baking chemistry plays a crucial role in creating the perfect texture. Fats coat flour proteins, preventing strong gluten networks and ensuring a tender result. The hygroscopic nature of sugar attracts and retains moisture, which means your cake stays deliciously moist for days.

Eggs contribute significantly to the cake’s moisture content, containing approximately 90% water. When combined with the natural juices from fresh apples, they create a rich, moist environment. This transforms a simple baked dessert into a culinary masterpiece.

Understanding these scientific principles helps you craft a homemade pastry that’s not just delicious, but perfectly balanced in texture and flavor.

Unique Texture and Crumb Structure

Making the perfect fresh apple cake is all about finding the right balance. It’s about mixing moisture and texture just right. This turns simple ingredients into a dessert that’s truly special.

The secret to a great fresh apple cake is its crumb. Getting the right density is all about choosing the right ingredients and how you mix them.

Creating the Perfect Density

Density is key to how the cake feels in your mouth. To get it just right, remember these tips:

  • Use room temperature ingredients for even mixing
  • Carefully measure flour to prevent a dense result
  • Avoid overmixing the batter
  • Check baking powder freshness

Balance of Moistness and Crumb

A great orchard fruit recipe balances moistness and crumb perfectly. The right method keeps your cake soft but not soggy.

Role of Oil vs Butter

Many bakers wonder if oil or butter is better for fresh apple cake. Oil has some big advantages:

  • Creates a more uniform moisture distribution
  • Produces a softer, more tender crumb
  • Extends the cake’s shelf life
  • Prevents the cake from becoming too dense

When picking your fat, think about how it affects your apple cake’s texture.

Special Spices and Flavor Enhancers

Cinnamon-Spiced Cake Spices

Adding the right spices makes your autumn treat truly special. A cinnamon-spiced cake goes from ordinary to amazing with the right mix of aromatic ingredients. These ingredients wake up your taste buds.

The spice mix is crucial for a delicious apple cake. Key spices that make your treat stand out include:

  • Cinnamon: The star of the cinnamon-spiced cake, providing warm depth
  • Nutmeg: Adds subtle complexity
  • Ginger: Brings a gentle heat
  • Allspice: Offers rounded warmth

When making your cake, use the right amounts to balance the flavors. Start with one teaspoon of cinnamon for that autumn warmth. Add 1/4 teaspoon each of ginger and nutmeg for a balanced spice mix.

Vanilla extract helps blend these spices together smoothly. For a richer taste, try adding a bit of rum or bourbon.

The aim is to make a cake that’s full of flavor and captures autumn’s essence. Every bite should be a taste of autumn.

Baking Techniques for the Perfect Fresh Apple Cake

Making a delicious homemade pastry needs precision and care. Your journey to a fresh apple cake starts with key baking techniques. These techniques turn simple ingredients into a tasty baked dessert.

Mastering Temperature Control

Getting the perfect apple cake begins with the right temperature. Set your oven to 350°F for the best results. This temperature ensures:

  • Even baking throughout the cake
  • Golden brown exterior
  • Moist interior

Selecting and Preparing Your Baking Pan

Your pan choice is crucial for your homemade pastry. Pick a 9-inch bundt pan or a standard cake pan. Follow these preparation tips:

  1. Grease the pan thoroughly
  2. Dust with flour to prevent sticking
  3. Consider using parchment paper for easy removal

Perfecting Timing and Doneness

The secret to a great baked dessert is knowing when it’s done. Use these methods to check your cake’s readiness:

  • Insert a toothpick into the center
  • If it comes out clean or with minimal crumbs, the cake is ready
  • Total baking time is typically 35-40 minutes

Pro tip: Let your cake cool on a wire rack for 20 minutes before inverting onto a serving platter. This helps keep the cake’s structure and ensures a perfect presentation of your homemade pastry.

Storage Solutions and Shelf Life

Fresh Apple Cake Storage Tips

Keeping your fresh apple cake tasty means using smart storage tips. The right storage keeps your autumn treat fresh and delicious.

For short-term, store at room temperature. Your cake stays fresh for up to 3 days. Use a cake dome or plastic wrap to keep it moist.

  • Room temperature storage: 3 days maximum
  • Refrigerator storage: Up to 5 days
  • Freezer storage: Up to 3 months

Refrigeration is great for longer storage. Wrap the cake tightly in plastic wrap or use an airtight container. This keeps moisture in and odors out.

Freezing is best for long-term storage. Wrap slices or the whole cake in plastic wrap, then in a freezer-safe container. It stays good for up to three months. Thaw at room temperature for the best taste and texture.

Pro tip: Let refrigerated or frozen cake come to room temperature before serving. This way, it regains its original moisture and softness. Your stored fresh apple cake will taste as good as when you baked it!

Creative Serving Suggestions and Pairings

Your fresh apple cake is a versatile orchard fruit recipe. It can make any meal special. Whether it’s a decadent dessert or a unique breakfast, this masterpiece offers endless possibilities.

Here are some mouthwatering serving suggestions to elevate your apple cake:

  • Warm Serving Options:
    • Top with a scoop of vanilla bean ice cream
    • Drizzle with homemade caramel sauce
    • Add a dollop of freshly whipped cream
  • Breakfast Variations:
    • Serve alongside morning coffee
    • Pair with Greek yogurt
    • Use as a quick brunch centerpiece

Perfect beverages can enhance your orchard fruit recipe’s harvest flavors. Try serving your cake with:

  1. Chai tea
  2. Cinnamon-spiced coffee
  3. Apple cider
  4. Cream liqueur for adult gatherings

Each slice has about 357 calories. It offers a sweet and spicy balance. This will impress your guests and satisfy your dessert cravings.

Variations on the Classic Fresh Apple Cake

Turn your grandma’s apple cake into a fun journey with new twists. Each change brings a fresh taste to this favorite dessert. You can make it your own while keeping its heart and soul.

Here are some cool ways to change up your apple cake:

  • Nutty Delight: Add ¾ cup of toasted walnut halves for a crunchy texture and rich flavor
  • Dried Fruit Fusion: Incorporate raisins or dried cranberries for a sweet and tangy dimension
  • Spice Blend Enhancement: Experiment with additional spices like cardamom or ginger

Want something even more special? Try these toppings:

  • Cream cheese frosting (using 6 ounces of reduced-fat cream cheese)
  • Streusel topping with brown sugar and chopped nuts
  • Caramel drizzle for extra indulgence

When you try new things with your apple cake, use firm apples like Granny Smith or Fuji. They keep the cake moist and just right. Every change lets you add your own touch to this classic dessert.

Conclusion

Your journey into the world of fresh apple cake is a delightful adventure. It’s more than just a baked dessert. Each slice shares a story of tradition, flavor, and skill.

The mix of spices, diced apples, and moist texture makes it a highlight of home baking. Baking this cake is about making memories. With just 55 minutes of prep and baking, you can turn simple ingredients into a stunning dessert.

This cake connects generations. You can try different apples like Honeycrisp or Granny Smith. This makes every bake a new experience.

Whether you’re new to baking or experienced, this cake has something special for you. It can be stored at room temperature for three days or frozen for two months. This means you can enjoy it whenever you want.

Your kitchen will fill with the scents of cinnamon, apples, and nostalgia. It invites family and friends to join in this timeless tradition. Start baking today and see why the fresh apple cake is a classic in American cooking.

Tagged : / / / / /