Cottage Cheese Flatbread: The Ultimate High-Protein Bread

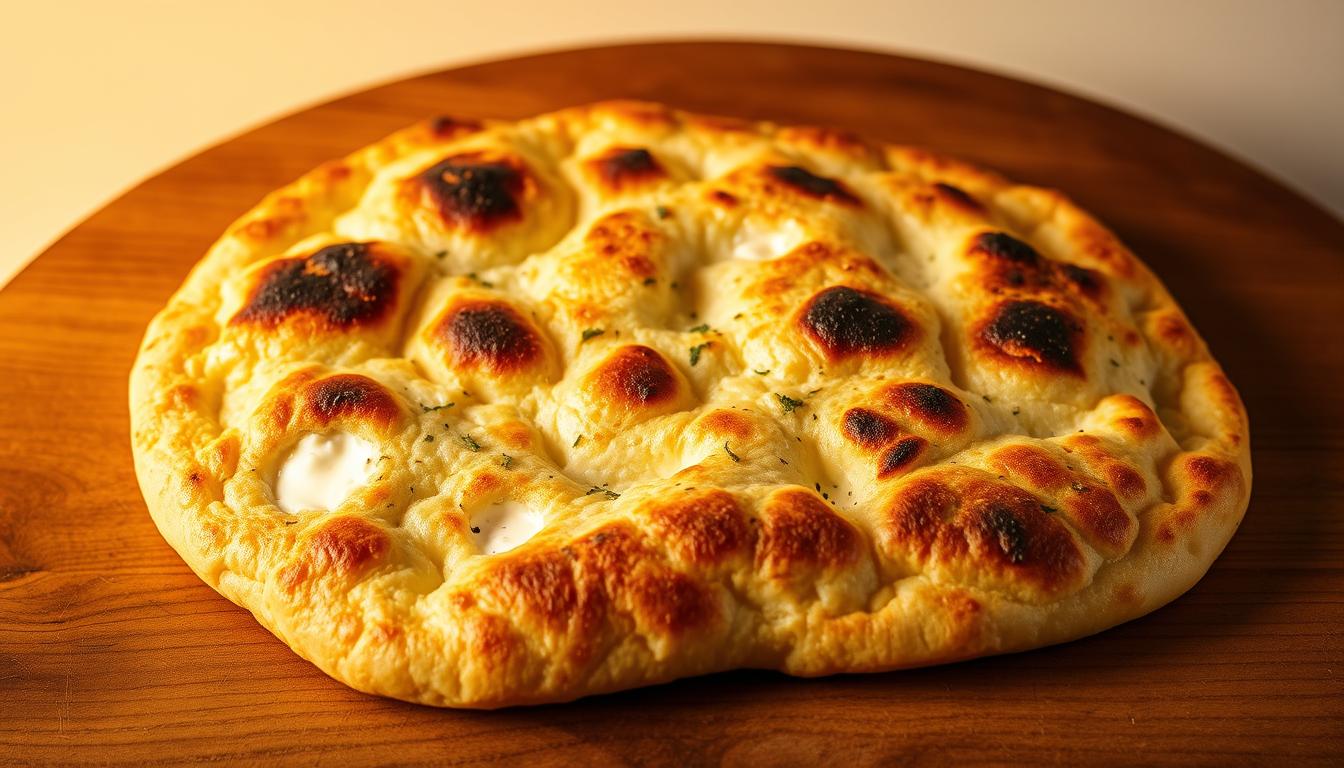
Imagine finding a bread that boosts your nutrition without losing flavor. The healthy cottage cheese flatbread is more than a trend. It’s a breakthrough for fitness lovers, busy workers, and anyone looking for a protein-rich bread.

This flatbread is a nutritional leap forward. With just two main ingredients, you can make a bread that’s high in protein and low in carbs. It’s perfect for keto diets, boosting protein, or just a tasty bread substitute.

What sets this flatbread apart is its simplicity and health benefits. It’s loaded with protein and super easy to make. It changes how we think about making bread.

Why This High-Protein Bread Is Taking Over Social Media

The cottage cheese flatbread recipe is all over social media, catching the eye of health-focused foodies. It’s not just a fleeting trend. It’s a nutritional powerhouse that’s changing how we see bread alternatives.

This flatbread’s viral success comes from its amazing nutrition and versatility. It’s packed with protein and meets many dietary needs. Fitness fans and home cooks love it.

Nutritional Powerhouse

So, what makes this flatbread stand out? Let’s look at its health benefits:

  • High protein content with up to 25 grams per cup of cottage cheese
  • Gluten-free and grain-free options
  • Rich in essential nutrients like calcium and B vitamins
  • Low in calories and fat

Perfect for Modern Dietary Needs

Your diet doesn’t have to be strict anymore. This easy cottage cheese flatbread meets different nutritional needs, including:

  • Keto-friendly diets
  • Gluten-free meal plans
  • High-protein nutritional strategies
  • Weight management programs

Budget-Friendly Bread Alternative

Goodbye, pricey specialty breads. This cottage cheese flatbread recipe is affordable and nutritious. With cottage cheese, eggs, and parmesan, you can make a versatile bread alternative for any meal plan.

Essential Ingredients for Cottage Cheese Flatbread

Making a tasty homemade cottage cheese flatbread is easy. You just need a few simple ingredients. These ingredients are not only delicious but also good for you.

The main ingredients for your flatbread are:

  • Cottage cheese (1 cup) – Choose from full-fat, reduced-fat, or fat-free options
  • 2 large whole eggs

You can also add some optional seasonings to make your flatbread even more delicious. Try adding:

  • ¾ teaspoon garlic powder
  • 1 teaspoon Italian seasoning

When picking cottage cheese, each type has its own taste and nutritional value. Full-fat cottage cheese has a richer taste and more calories. On the other hand, fat-free cottage cheese is lighter but still packed with protein.

This flatbread is a protein powerhouse. It gives you about 25 grams of protein per serving. It’s perfect for those on a low-carb diet or anyone looking for a protein-rich alternative to regular bread.

Pro tip: Try different cottage cheese types to find your favorite taste and texture. This recipe is great because it’s easy to make and can be customized to your liking.

Kitchen Tools and Equipment You’ll Need

Making easy cottage cheese flatbread needs some basic kitchen tools. You probably have these already. The right tools make making homemade cottage cheese flatbread fun and easy.

Basic Equipment Requirements

To start making cottage cheese flatbread, you need a few things:

  • High-speed blender or food processor
  • Quarter-sized baking sheet
  • Parchment paper
  • Silicone spatula
  • Measuring cups and spoons

Optional Tools for Better Results

These tools can make your cottage cheese flatbread even better:

  • Digital kitchen scale for exact measurements
  • Silicone baking mat
  • Bench scraper
  • Kitchen thermometer

Baking Surface Options

The right baking surface is key for perfect cottage cheese flatbread. A quarter-sized sheet pan (about 9 x 13 inches) is best for the right thickness. Use parchment paper or a silicone mat to prevent sticking and make it easy to remove.

Pro tip: If you don’t have a quarter-sized sheet pan, a regular baking sheet works too. Just spread your flatbread to 8 x 10 inches for the best results.

Step-by-Step Preparation Method

Making an easy cottage cheese flatbread recipe is easier than you think. This high-protein bread is ready in just 20 minutes. Here’s how to do it step by step.

To begin your cottage cheese flatbread recipe, collect these essential ingredients:

  • 8 oz cottage cheese (4-5% fat content)
  • 2 large eggs
  • 1 tbsp flax or hemp seeds
  • Optional seasonings like garlic powder, paprika

Here are the simple steps to prepare your flatbread:

  1. Preheat your oven to 350°F (177°C)
  2. Blend cottage cheese and eggs until smooth
  3. Mix in seeds and desired seasonings
  4. Spread mixture evenly on a baking sheet
  5. Bake for 35-40 minutes until golden brown

The outcome is a protein-rich flatbread with only 178 calories per serving. Pro tip: For a crisper flatbread, spread the mixture evenly on the baking sheet. This easy cottage cheese flatbread can be kept in an airtight container for 3-4 days. Or, freeze it for up to 3 months.

Seasoning and Flavoring Options

Your healthy cottage cheese flatbread doesn’t have to be boring. With the right seasonings, it can become a delicious treat that’s also good for you.

Try out different flavors to make your cottage cheese flatbread more exciting. The basic recipe is a great starting point for your creativity.

Sweet Variations

If you like sweet things, cottage cheese flatbread is perfect for you:

  • Cinnamon and vanilla extract
  • Lemon or orange zest
  • Maple syrup drizzle
  • Honey and almond slivers

Savory Combinations

For those who prefer savory flavors, here are some great options:

  • Garlic and herb blend
  • Italian seasoning mix
  • Taco seasoning
  • Curry powder
  • Smoked paprika

International Flavor Profiles

Explore global flavors with these international-inspired seasonings:

  • Mediterranean: Za’atar and olive oil
  • Mexican: Chili powder and cumin
  • Indian: Garam masala and turmeric
  • Middle Eastern: Sumac and sesame seeds

Remember to add seasonings before baking. This way, they mix well with your flatbread. Start with a little and adjust to your liking.

Tips for Perfect Texture and Consistency

Homemade Cottage Cheese Flatbread Texture Tips

Making the perfect homemade cottage cheese flatbread needs attention to detail. It’s all about how ingredients mix and the right preparation steps.

Here are key points to focus on when making your cottage cheese flatbread:

  • Blend ingredients until smooth to avoid cottage cheese lumps
  • Spread batter evenly for a consistent thickness (about 1/4 inch)
  • Use a flat spatula for precise spreading
  • Bake at 350°F (175°C) for 35-40 minutes

The right mix of ingredients is crucial for texture. Use a 1:1 ratio of cottage cheese to eggs for the best structure. Full-fat cottage cheese is better than low-fat for a better taste and texture.

Cooling is a must after baking. Let the flatbread cool completely in the baking tray. This step makes it firm and prevents it from crumbling when you cut or handle it.

  • Cool time: Minimum 15-20 minutes
  • Store in refrigerator up to 5 days
  • Reheat at 300°F for best texture preservation

Having trouble with texture? If it’s too dry, bake for 5 minutes less. For a crisper edge, spread the batter thinner and use parchment paper for even heat.

Creative Ways to Serve Your Cottage Cheese Flatbread

Your easy cottage cheese flatbread is incredibly versatile. It can make any meal special. Its crispy texture and high protein make it perfect for many dishes.

This flatbread is very adaptable. It’s great for breakfast, lunch, or a snack. It’s a recipe that fits any time of day.

Breakfast Inspiration

Start your day with these delicious cottage cheese flatbread ideas:

  • Classic avocado toast with poached eggs
  • Scrambled egg wrap with fresh herbs
  • Smoked salmon and cream cheese roll-up
  • Breakfast pizza with sunny-side-up egg

Lunch and Dinner Creations

Transform your easy cottage cheese flatbread into exciting main courses:

  • Mediterranean-style veggie wrap
  • Low-carb pizza base with your favorite toppings
  • Grilled chicken and pesto sandwich
  • Tuna salad flatbread roll

Quick Snack Solutions

Craving a quick bite? Your cottage cheese flatbread has you covered:

  • Cut into crispy chips for dipping
  • Top with hummus and fresh vegetables
  • Spread with nut butter for a protein-packed treat
  • Create mini pizzetta bites

Try different flavors and find your favorite way to enjoy this versatile flatbread!

Storage and Reheating Guidelines

Cottage Cheese Flatbread Storage Tips

Storing your healthy cottage cheese flatbread right keeps it tasty and fresh. After making it, follow simple steps to keep it good. This way, you can enjoy it for longer.

Keeping your flatbread in the right place is key. Here’s what to do:

  • Store the flatbread in an airtight container
  • Place parchment paper between each flatbread slice
  • Refrigerate immediately after cooling
  • Consume within 5 days for optimal taste and texture

When reheating, be gentle to keep the texture right. Here are the best ways:

  1. Air Fryer Method: Heat at 350°F for 1-2 minutes
  2. Toaster Oven: Warm at 300°F for 3-4 minutes
  3. Regular Oven: Preheat to 325°F and heat for 2-3 minutes

Freezing is not the best for this flatbread. But, making small batches helps keep it fresh. Enjoy your cottage cheese flatbread within a few days for the best taste and health benefits.

Nutritional Information and Dietary Considerations

Your healthy cottage cheese flatbread is a nutritional powerhouse. It supports various dietary goals. This protein-packed bread alternative has a nutritional profile that stands out from traditional bread.

Let’s look at the key nutritional highlights of this cottage cheese flatbread:

  • Protein Content: Approximately 23 grams per serving
  • Total Calories: About 245 kcal per flatbread
  • Carbohydrates: Low at just 3 grams per serving
  • Fat Content: 9 grams per serving

This cottage cheese flatbread is an excellent choice for many diets. It’s naturally gluten-free, great for those with gluten sensitivities or celiac disease. Its low-carb profile is perfect for ketogenic or low-carb diets.

Nutritional benefits go beyond basic macronutrients. Cottage cheese is rich in calcium and high-quality protein. Each serving offers a balanced mix of proteins, supporting muscle maintenance and nutritional needs.

If you’re tracking your diet, this flatbread is flexible. You can adjust ingredients to meet your nutritional goals. Whether you want to increase protein or stay low-carb, it’s easy to customize.

Conclusion

Exploring easy cottage cheese flatbread opens up new culinary adventures for health-focused cooks. This simple recipe turns into a nutritious meal in just 25 minutes. It’s a protein-rich alternative to regular bread, ideal for quick and versatile meals.

TikTok has made high-protein cooking trendy, and this flatbread is at the top. With just low-fat cottage cheese and eggs, you can make a tasty, protein-packed wrap. You can also add herbs, onion salt, and garlic powder to make each batch unique.

This recipe is more than a meal; it’s a start to healthier eating. It’s great for boosting protein, cutting carbs, or just enjoying a fast, delicious meal. Get creative, try new flavors, and make it your own.

Remember, cooking is all about exploring and having fun. Your cottage cheese flatbread journey is just starting, with endless possibilities ahead.

Tagged : / /

Marry Me Chicken Soup Recipe: 8 Simple Steps

Get ready to fall in love with the most irresistible marry me chicken soup recipe you’ll ever taste! This creamy, soul-warming dish combines the comfort of traditional chicken soup with the rich, romantic flavors that made the original “marry me chicken” recipe go viral. Legend has it that this soup is so delicious, it’s sparked countless proposals – hence the charming name!

As a busy home cook myself, I understand the challenge of creating restaurant-quality meals without spending hours in the kitchen. That’s why I’m excited to share this simplified version that delivers all the flavor in just 30 minutes. Like our popular Tuscan Chicken Pasta, this soup transforms simple ingredients into something truly extraordinary.

What is Marry Me Chicken Soup? Marry Me Chicken Soup is the cozy, bowl-worthy adaptation of the famous Marry Me Chicken dish that took social media by storm. They say the way to someone’s heart is through their stomach, and this recipe proves it! Think creamy, garlic-infused broth, tender chicken, sun-dried tomatoes, and fresh herbs, all combined in one heartwarming bowl.

Why did it earn such a romantic name? The story goes that this dish is so delicious, it’s prompted marriage proposals! Whether or not you’re looking to pop the question, I guarantee this soup will become a regular in your recipe rotation.

This marry me chicken soup recipe has taken social media by storm, and for good reason!

Why You’ll Love This Marry Me Chicken Soup Recipe:

  1. Perfect Balance of Flavors This soup strikes the perfect balance between creamy and savory, with hints of garlic, Italian herbs, and sun-dried tomatoes creating layers of flavor in every spoonful. The Parmesan cheese adds a rich, nutty depth that elevates this from simple soup to something special.
  2. Budget-Friendly Comfort Making this marry me chicken soup recipe at home costs a fraction of what you’d pay at a restaurant. Plus, it makes enough to feed the whole family with possible leftovers for lunch the next day.
  3. Customizable Creation While the base recipe is incredible on its own, you can easily adapt it to your taste preferences or dietary needs. Add more vegetables, adjust the creaminess, or spice it up – the possibilities are endless!

How to Make Marry Me Chicken Soup Recipe:

Quick Overview: Prep Time: 10 minutes Cook Time: 20 minutes Total Time: 30 minutes Servings: 6

Before we dive into our marry me chicken soup recipe, let’s gather all the ingredients you’ll need

Key Ingredients:

  • 2 lbs chicken breasts, diced
  • 1 cup heavy cream
  • 4 cups chicken broth
  • 1/2 cup sun-dried tomatoes, chopped
  • 4 cloves garlic, minced
  • 1 cup Parmesan cheese, grated
  • 1 tablespoon Italian seasoning
  • Salt and pepper to taste
  • 2 tablespoons olive oil
  • Fresh basil for garnish

Step-by-Step Instructions:

  1. Prep the Base
  • Heat olive oil in a large pot over medium heat
  • Add minced garlic and sauté until fragrant (1 minute)
  • Season diced chicken with salt, pepper, and Italian seasoning
  1. Cook the Chicken
  • Add seasoned chicken to the pot
  • Cook until golden brown (5-7 minutes)
  • Remove chicken and set aside
  1. Create the Soup Base
  • In the same pot, add chicken broth
  • Bring to a gentle simmer
  • Add sun-dried tomatoes
  1. Add Creaminess
  • Pour in heavy cream
  • Stir in Parmesan cheese
  • Simmer until slightly thickened
  1. Combine
  • Return chicken to the pot
  • Simmer for 5 minutes
  • Adjust seasoning to taste

What to Serve Marry Me Chicken Soup With:

  • Crusty artisan bread
  • Fresh garden salad
  • Garlic knots
  • Roasted vegetables
  • White wine (for a romantic dinner)

Top Tips for Perfecting This Recipe:

To make this marry me chicken soup recipe ahead of time, follow these meal prep tips:

  1. Use high-quality Parmesan cheese for the best flavor
  2. Don’t rush the simmering process
  3. Cut chicken into uniform pieces for even cooking
  4. Taste and adjust seasoning before serving
  5. Add extra cream for a richer consistency

Storing and Reheating Tips: Storage:

  • Refrigerate in an airtight container for up to 3 days
  • Freeze for up to 3 months (without cream)
  • Store garnishes separately

Reheating:

  • Warm slowly over medium-low heat
  • Add a splash of cream or broth if needed
  • Stir occasionally to prevent separation
  • Microwave in 30-second intervals, stirring between each

This marry me chicken soup recipe is more than just a meal – it’s a celebration of comfort food at its finest. Whether you’re cooking for a special someone or simply treating yourself to a cozy dinner, this recipe is guaranteed to impress. Give it a try and discover why it’s earned its romantic reputation!

Philly Cheesesteak Pasta Recipe: 10 Expert Cooking Tricks

Every kitchen has its own story. Today, we’re going to add a new chapter to yours with a delicious philly cheesesteak pasta recipe. It’s a mix of comfort food and gourmet flair. Imagine the tasty flavors of a Philly cheesesteak in every bite of your pasta.

Get ready to learn expert cooking tricks that will take your pasta to the next level. This recipe is more than just mixing ingredients. It’s about creating a flavor symphony that will excite your taste buds. Whether you’re an experienced cook or just starting out, our 10 expert tips will help you make perfect pasta.

Key Takeaways

  • Master the art of perfectly cooked steak in pasta
  • Learn professional techniques for sauce consistency
  • Discover how to balance flavors like a chef
  • Unlock the secrets of one-pot cooking
  • Create a restaurant-quality meal in just 30 minutes

Essential Ingredients for Perfect Philly Cheesesteak Pasta

Making a memorable Philly Cheesesteak Pasta starts with choosing the best ingredients. You need to know how each part adds to the dish’s flavor and texture.

Selecting the Right Cut of Beef

The beef you pick is key for a real Philly Cheesesteak taste and tender meat. Two top picks are:

  • Skirt steak: Known for intense beef flavor
  • Ribeye: Offers superior marbling and tenderness

Thinly slice the beef against the grain for softness and easy chewing. You want meat that melts in your mouth and pairs well with pasta.

Pasta Types and Variations

The pasta you choose can make your Philly Cheesesteak Pasta stand out. Here are some good options:

  • Cavatappi: Corkscrew shape captures sauce beautifully
  • Rigatoni: Large tubes hold cheese sauce effectively
  • Penne: Classic choice with excellent sauce adherence

Cheese Selection Guide

Your cheese choice is crucial. Provolone is the traditional pick, but feel free to try others:

  • Provolone: Classic Philly Cheesesteak cheese
  • White cheddar: Sharp, tangy alternative
  • Monterey Jack: Mild and creamy option

For a great Philly Cheesesteak Pasta, balance these ingredients carefully.

Kitchen Equipment and Preparation Tips

To make the perfect Philly Cheesesteak Pasta, you need the right tools and a good setup. The success of your dish depends on choosing the best equipment and organizing your kitchen well.

A large skillet is key for one-pot cooking. Pick a skillet that’s big enough for all your ingredients. This ensures everything cooks evenly and avoids overcrowding. A 12-inch cast-iron or stainless steel skillet is perfect for this recipe.

  • Key kitchen equipment for Philly Cheesesteak Pasta:
    • Large 12-inch skillet
    • Sharp chef’s knife
    • Cutting board
    • Wooden spoon or spatula
    • Measuring cups and spoons

Good preparation is essential for smooth cooking. Begin with mise en place – get all your ingredients ready before you start. Slice the beef thinly against the grain for tenderness. Also, chop your veggies evenly so they cook at the same time.

  • Top preparation tips:
  • Slice beef when it’s slightly frozen for cleaner cuts
  • Measure ingredients beforehand
  • Have all tools within reach
  • Preheat your skillet for even heat distribution

Mastering one-pot cooking takes practice and the right tools. With quality equipment and these tips, you’ll make a tasty Philly Cheesesteak Pasta with less cleanup.

The Ultimate Philly Cheesesteak Pasta Recipe

Explore the tasty world of philly cheesesteak pasta with this easy guide. Turn your kitchen into a paradise by making this dish. It mixes Philly cheesesteak flavors with pasta for a comforting meal.

Base Recipe Instructions

Begin your philly cheesesteak pasta by getting these key items:

  • 300 g dried pappardelle pasta
  • 400 g ribeye steak, sliced into 1 cm strips
  • 240 ml double cream
  • Provolone and mozzarella cheese
  • Seasonings to taste

Cooking Time and Temperature Guide

Getting the cooking right is key. Follow these steps:

  1. Cook pasta for 10-12 minutes until al dente
  2. Fry steak strips for 3-4 minutes until browned
  3. Keep the heat medium-high for the best flavor

Sauce Consistency Tips

Getting the sauce right is crucial. Use heavy cream with about 48% fat for a creamy sauce. Stir constantly to avoid lumps and get a smooth sauce that covers every pasta strand.

Pro tip: If the sauce is too thick, add some pasta water. This trick makes your philly cheesesteak pasta silky and restaurant-worthy, impressing all.

Mastering the One-Pot Cooking Method

One-pot cooking makes making Philly Cheesesteak Pasta easy and fun. It cuts down on cleanup and boosts flavor. You get a tasty meal without much kitchen work.

Here’s why one-pot cooking is great for Philly Cheesesteak Pasta:

  • Simplified meal preparation
  • Reduced dishwashing time
  • Enhanced flavor integration
  • Consistent heat distribution

Here are some tips for one-pot cooking:

  1. Choose a heavy-bottomed pot for even heat distribution
  2. Control cooking temperature carefully
  3. Stir ingredients regularly to prevent sticking
  4. Layer ingredients strategically for optimal flavor melding

Success in one-pot cooking comes from managing heat and timing. Start by searing meat at high heat. Then, add pasta and other ingredients slowly. This way, each part keeps its texture and blends well.

With practice, you’ll get better at one-pot cooking. Your Philly Cheesesteak Pasta will become a hit with everyone.

Secret Techniques for Tender Steak

Making the perfect Philly Cheesesteak Pasta begins with tender steak techniques. The right method can turn tough beef into tender, flavorful bites. Each piece should be soft and full of taste.

Proper Slicing Methods

Slicing is key for tender meat. Always cut against the grain. This breaks down muscle fibers, making the meat tender and easy to chew.

  • Use a sharp knife for clean, precise cuts
  • Slice beef into thin, uniform strips
  • Cut perpendicular to the muscle fiber direction

Optimal Cooking Temperature

Temperature control keeps the meat tender. Aim for medium-rare to medium, between 130-140°F. This keeps your beef juicy and full of flavor.

  1. Use a meat thermometer for accuracy
  2. Remove steak from heat slightly before desired temperature
  3. Let meat rest for 5-7 minutes to redistribute juices

Timing and Doneness Tips

Cooking time affects the meat’s texture. Quick, high-heat searing followed by resting keeps it tender. Avoid overcooking to prevent tough, chewy beef.

By using these tender steak techniques, your Philly Cheesesteak Pasta will be top-notch.

Perfecting the Vegetable Blend

Philly Cheesesteak Pasta Vegetable Blend

Creating the perfect vegetable blend is key to making your Philly Cheesesteak Pasta stand out. The right mix not only boosts nutrition but also improves flavor and texture. It makes the dish truly special.

When picking vegetables, focus on these:

  • Yellow onions for a sweet, caramelized base
  • Green bell peppers for a crisp texture
  • Red bell peppers for vibrant color and mild sweetness

Make sure to slice your vegetables thinly and evenly. Thin, uniform slices help them cook fast and blend well with pasta and meat.

Here are some tips to master your vegetable blend:

  1. Sauté vegetables for 7-10 minutes until slightly caramelized
  2. Use 2 tablespoons of butter for optimal flavor development
  3. Season vegetables with a pinch of salt and pepper to enhance their natural taste

If you’re feeling bold, try adding cherry tomatoes, spinach, or zucchini to your mix. They bring more nutrition and depth to the dish. Yet, they still keep the Philly Cheesesteak taste you love.

Sauce Making Expertise

Making the perfect sauce is key to a great Philly Cheesesteak Pasta. Your sauce skills can turn this dish into something amazing. It will have rich flavors and creamy textures that you’ll love.

Crafting the Alfredo Base

The alfredo base is essential for that creamy feel. You need to focus on quality and detail. Here’s what you’ll need:

  • 12 ounces of cream cheese
  • ¾ cup unsalted butter
  • 1.5 cups heavy whipping cream
  • 1 cup Parmesan cheese

Mastering Seasoning Balance

Getting the seasoning right is crucial. You want a mix of flavors that enhance the beef and veggies.

  • Use ½ teaspoon kosher salt
  • Add ¼ teaspoon ground black pepper
  • Include 1 tablespoon Worcestershire sauce for depth

Slowly adding ingredients is the secret to a great sauce. Start by melting the butter for 2 minutes. Then, mix in the cream cheese over 3 minutes. Let it thicken for 2-3 minutes, stirring often to avoid burning.

Pro tip: Your alfredo base should coat the back of a spoon smoothly, indicating the right consistency.

Storage and Reheating Guidelines

Philly Cheesesteak Pasta Storage Tips

Your Philly Cheesesteak Pasta is best stored and reheated to keep its great taste and texture. The right storage tips ensure your leftovers stay safe and tasty.

Here are the key storage tips:

  • Cool the pasta completely before storing
  • Use airtight containers to prevent moisture loss
  • Refrigerate within 2 hours of cooking
  • Store leftovers for 3-4 days maximum

Reheating pasta can be tricky, but these methods will help you restore the dish’s original taste and consistency:

  1. Microwave Method:
    • Add a splash of water or beef broth
    • Cover with a damp paper towel
    • Heat in 30-second intervals
    • Stir between intervals to distribute heat evenly
  2. Stovetop Method:
    • Use low heat
    • Add a small amount of cream or broth
    • Stir frequently to prevent sticking

For longer-term storage, freeze your Philly Cheesesteak Pasta for up to 2-3 months. Thaw in the fridge overnight before reheating with the methods above.

Recipe Variations and Customization Options

Exploring recipe variations can make your Philly Cheesesteak Pasta a unique dish. Your creativity lets you try different proteins and dietary changes. This keeps the dish exciting and tailored to your taste.

Protein Alternatives

There are many tasty protein options for different diets:

  • Ground turkey as a leaner beef substitute
  • Shredded chicken for a lighter protein choice
  • Plant-based meat crumbles for vegetarian diets
  • Portobello mushrooms for a hearty vegetarian option

Dietary Modifications

Make your Philly Cheesesteak Pasta fit various dietary needs with simple swaps:

  1. Gluten-free pasta for celiac or gluten-sensitive individuals
  2. Low-fat cheese options to reduce calorie intake
  3. Dairy-free cheese alternatives for lactose-intolerant diners
  4. Whole wheat pasta for increased fiber

Try different cheeses like mozzarella or Colby jack for unique flavors. Each change lets you make a pasta dish that’s both healthy and delicious, just like a Philly Cheesesteak.

Conclusion

Your Philly cheesesteak pasta mastery is now complete. You’ve turned a simple dish into a top-notch meal. The secret is using the best ingredients, precise cooking, and adding your own twist.

This recipe is super versatile. It’s ready in just 30 minutes and feeds six people. The mix of lean beef, cooked pasta, and rich cheese makes it a hit. It’s perfect for family dinners or parties, showing off your cooking skills.

Try using chicken or tofu instead of beef. Experiment with different pasta shapes like rotini or penne. Remember, cooking is all about trying new things. Each time you make this dish, you’ll get better and make it your own.

What you’ve learned goes beyond this recipe. You’ve picked up skills like sautéing veggies and making creamy sauces. Keep practicing and stay curious. Enjoy the journey of becoming a more confident home chef.

Tagged : / / /

Chicken Sliders Recipe: 7 Easy Steps for Perfect Mini Burgers

There’s something undeniably satisfying about biting into a perfectly juicy chicken slider – that first taste where the tender chicken meets the soft bun, complemented by creamy sauce and fresh toppings. This chicken sliders recipe isn’t just delicious; it’s a versatile crowd-pleaser that works for everything from casual weeknight dinners to elaborate game day spreads.

I discovered the magic of chicken sliders when hosting my first Super Bowl party. Overwhelmed with preparing food for fifteen hungry guests, I needed something simple yet impressive. This chicken sliders recipe was the unexpected star of the show, with guests asking for the recipe before halftime even started!

What makes this chicken sliders recipe special is its perfect balance of simplicity and flavor. With just 30 minutes of prep time, even kitchen novices can create restaurant-quality mini burgers. The recipe is endlessly customizable, making it ideal for families with picky eaters – everyone can add their preferred toppings!

Unlike my popular Buffalo Chicken Dip that requires constant attention, these sliders can be prepped ahead and popped in the oven when guests arrive. The result? You spending less time in the kitchen and more time enjoying company.

Ready to transform ordinary chicken into extraordinary hand-held delights that will have everyone reaching for seconds? Let’s dive into this game-changing chicken sliders recipe that might just become your new go-to crowd pleaser.

What is Chicken Sliders Recipe?

Have you ever wondered why these delightful mini sandwiches earned the name “sliders”? Legend has it that the term originated from Navy sailors who noticed how these small burgers would “slide” across the greasy cooking surface with just a slight push. These bite-sized wonders have evolved from their humble beginnings to become a staple at parties, sports gatherings, and family dinners nationwide.

My grandmother always said, “The way to a man’s heart is through his stomach,” and this chicken sliders recipe certainly proves her right! They’re essentially mini chicken sandwiches featuring seasoned ground chicken patties nestled in soft slider buns, often topped with cheese, sauce, and crisp vegetables.

Don’t let their small size fool you – these little burgers pack a mighty flavor punch! Why not give this chicken sliders recipe a try tonight and discover why these mini marvels continue to slide their way into everyone’s hearts?

Why You’ll Love This Chicken Sliders Recipe

Juicy Perfection in Every Bite

The star quality of this chicken sliders recipe is undoubtedly the juiciness of each patty. By using ground chicken with the right fat content and adding a few special ingredients, you’ll create incredibly moist patties that avoid the dreaded dryness that often plagues chicken burgers. The secret combination of breadcrumbs and Greek yogurt locks moisture inside the patties, ensuring each bite delivers succulent satisfaction.

Budget-Friendly Crowd Pleaser

Making this chicken sliders recipe at home costs a fraction of what you’d pay at restaurants or for pre-made versions. Ground chicken is typically more affordable than beef, and the recipe stretches to feed many hungry mouths. One batch easily serves 6-8 people, making it perfect for large gatherings without breaking the bank. Plus, you can use ingredients you likely already have in your pantry!

Endless Customization Possibilities

What truly sets this chicken sliders recipe apart is its incredible versatility. The basic chicken patty serves as a delicious canvas for countless flavor combinations. Whether you’re craving southwest sliders with avocado and chipotle mayo, Mediterranean-inspired ones with feta and tzatziki, or classic American versions with cheese and pickle – the options are limitless! This adaptability makes the chicken sliders recipe perfect for pleasing diverse palates at any gathering.

If you’ve enjoyed my Greek Chicken Wraps, you’ll appreciate how these sliders offer similar fresh flavors in a different, party-friendly format. Ready to become the ultimate host or family dinner hero? Let’s get cooking with this fantastic chicken sliders recipe!

How to Make Chicken Sliders Recipe

Quick Overview

This chicken sliders recipe combines lean protein with bold flavors for a satisfying meal that comes together in under 30 minutes. The patties stay juicy thanks to a few secret ingredients, while the cooking method ensures they develop a beautiful golden crust without drying out. Perfect for busy weeknights or feeding a crowd!

Key Ingredients

  • 1 pound ground chicken (preferably not too lean)
  • 1/3 cup breadcrumbs
  • 2 tablespoons Greek yogurt
  • 1 egg
  • 1/2 onion, finely diced
  • 2 garlic cloves, minced
  • 1 teaspoon Italian seasoning
  • 1/2 teaspoon paprika
  • Salt and pepper to taste
  • 12 slider buns
  • Butter for toasting buns
  • Toppings: cheese slices, lettuce, tomato, red onion, pickles, avocado
  • Sauce options: mayo, mustard, ketchup, BBQ sauce

Step-by-Step Instructions

Step 1: Prepare the Patty Mixture

In a large bowl, combine ground chicken, breadcrumbs, Greek yogurt, egg, diced onion, garlic, Italian seasoning, paprika, salt, and pepper. Mix gently with your hands until just combined – overmixing will result in tough patties. The mixture should feel slightly wet but hold together when formed. This foundation of our chicken sliders recipe ensures moist, flavorful patties.

Step 2: Form the Patties

Divide the mixture into 12 equal portions (about 1.5 oz each). Shape each portion into patties slightly larger than your slider buns, as they will shrink during cooking. Make a small indentation in the center of each patty with your thumb to prevent them from puffing up.

Step 3: Chill the Patties

Place formed patties on a parchment-lined tray and refrigerate for at least 15 minutes. This helps them firm up and hold their shape during cooking. If you’re short on time, you can freeze them for 5 minutes instead. This crucial step in our chicken sliders recipe guarantees perfectly shaped mini burgers.

Step 4: Cook the Patties

Heat a large skillet over medium heat with a tablespoon of oil. Once hot, cook the patties for 3-4 minutes per side until golden brown and the internal temperature reaches 165°F. Work in batches to avoid overcrowding the pan, which can cause the patties to steam rather than sear.

Step 5: Toast the Buns

While the patties are cooking, lightly butter the cut sides of your slider buns. In another pan or on a griddle, toast the buns butter-side down until golden, about 30 seconds to 1 minute. This simple touch elevates the entire chicken sliders recipe.

Step 6: Prepare Your Toppings

Arrange your chosen toppings and sauces on a serving platter or board. This creates an interactive dinner experience where everyone can customize their chicken sliders recipe to their liking.

Step 7: Assemble and Serve

Place each chicken patty on a bottom bun, add desired toppings and sauce, then cap with the top bun. Serve immediately while still warm, either on a platter or secured with decorative toothpicks. Your homemade chicken sliders recipe is now ready to impress!

What to Serve Chicken Sliders Recipe With

Turn your chicken sliders recipe into a complete meal with these perfect accompaniments:

  • Sweet Potato Fries: The slight sweetness pairs beautifully with the savory sliders.
  • Rainbow Slaw: Add a refreshing crunch and vibrant colors to contrast the rich sliders.
  • Corn on the Cob: Classic BBQ side that complements the casual, fun nature of sliders.
  • Fruit Skewers: Light and refreshing counterpoint to the hearty chicken sliders recipe.
  • Cucumber Salad: Light, crisp, and refreshing alongside the more substantial sliders.

For drinks, consider serving homemade lemonade, iced tea, or for adults, a light beer or white wine sangria to complement this chicken sliders recipe perfectly.

Top Tips for Perfecting Chicken Sliders Recipe

  • Don’t use extra-lean ground chicken – the small amount of fat helps keep the patties juicy in this chicken sliders recipe.
  • Add moisture boosters like Greek yogurt or a tablespoon of olive oil if your ground chicken seems very lean.
  • Season generously – chicken needs proper seasoning to avoid blandness.
  • Don’t skip the chilling step – it helps the patties hold their shape during cooking.
  • Use a meat thermometer to ensure doneness without overcooking.
  • Try different flavor profiles – add chopped herbs, grated cheese, or different spice blends to the patty mixture to customize your chicken sliders recipe.
  • Substitutions: No slider buns? Use dinner rolls or even split regular hamburger buns into quarters.

Storing and Reheating Tips

This chicken sliders recipe is perfect for meal prep or making ahead for parties!

Storing:

  • Refrigerate assembled sliders (without lettuce and tomato) in an airtight container for up to 3 days.
  • Store uncooked patties between parchment paper layers for up to 24 hours in the refrigerator or 3 months in the freezer.
  • Keep cooked patties separate from buns and toppings for best results when storing longer than a few hours.

Reheating:

  • Microwave: Place sliders (without lettuce and tomato) on a microwave-safe plate. Cover with a damp paper towel and heat for 30 seconds, checking and adding more time if needed.
  • Oven: Wrap sliders in foil and heat at 350°F for 10 minutes until warmed through.
  • Air fryer: 3 minutes at 350°F will revive the texture perfectly.
  • Skillet: For patties only, reheat in a covered skillet with a tablespoon of water for 2-3 minutes.

Add any fresh toppings after reheating for the best texture and flavor combination. This chicken sliders recipe is just as delicious the next day when properly stored and reheated!

Carajillo Recipes: Top 3 Authentic Spanish Versions

Picture yourself in a charming Spanish café, where the rich aroma of coffee mingles with the warmth of fine spirits. That’s the essence of a perfectly crafted carajillo, Spain’s beloved coffee cocktail. This sophisticated drink has evolved from its humble military origins to become a staple in Spanish and Latin American culture. Today, I’m sharing three authentic carajillo recipes that will transport your taste buds to the vibrant streets of Barcelona.

As someone who discovered carajillo during my travels through Spain, I’ve learned that this isn’t just another coffee cocktail – it’s an art form that deserves attention to detail. While you might be familiar with Irish coffee, carajillo offers a unique blend of flavors that’s both bold and refined. The best part? You can create these café-quality drinks right in your kitchen, using simple ingredients and traditional methods.

What is a Carajillo? The word “carajillo” has a fascinating origin story. During Spain’s occupation of Cuba, soldiers would spike their coffee with liquor for “coraje” (courage) – which eventually evolved into “carajillo.” Think of it as Spain’s answer to Irish coffee, but with its own Mediterranean flair. Whether you’re a coffee enthusiast or a cocktail lover, these carajillo recipes will add a touch of Spanish sophistication to your beverage repertoire. Ready to become your own Spanish barista?

These authentic carajillo recipes have been perfected through generations of Spanish bartenders. While modern carajillo recipes might include various spirits, we’re focusing on the most traditional versions.

While these Spanish carajillo recipes are the most traditional, you’ll find variations across different cultures. Mexican carajillo recipes often feature Licor 43 exclusively, while Cuban carajillo recipes tend to favor dark rum. Our featured carajillo recipes stay true to Spanish traditions.

Why You’ll Love These Carajillo Recipes:

  1. Versatility: Each version offers a unique flavor profile, from the sweet vanilla notes of Licor 43 to the robust character of brandy.
  2. Cost-Effective: Making carajillo at home saves money compared to café prices, while allowing you to perfect your preferred ratio.
  3. Impressive Yet Simple: These recipes require minimal ingredients but deliver maximum impact – perfect for entertaining or treating yourself.

Unlike complicated cocktail recipes, these carajillo recipes require minimal ingredients and equipment. These time-tested carajillo recipes have been selected for their authentic flavors and ease of preparation

How to Make Carajillo: Three Authentic Versions

Quick Overview: Each recipe takes less than 5 minutes to prepare and requires basic equipment you likely already have.

These classic carajillo recipes can be adjusted to your taste preferences. While many modern carajillo recipes call for alternative spirits, these versions maintain traditional proportions and methods.

Version 1: Classic Brandy Carajillo Ingredients:

  • 1.5 oz Spanish brandy
  • 1 shot (2 oz) freshly brewed espresso
  • Optional: brown sugar to taste

Instructions:

  1. Brew a fresh shot of espresso
  2. Warm a glass with hot water, then empty
  3. Pour brandy into the warmed glass
  4. Slowly add hot espresso
  5. Stir gently and serve immediately

Version 2: Licor 43 Carajillo Ingredients:

  • 1.5 oz Licor 43
  • 1 shot (2 oz) espresso
  • Ice cubes
  • Optional: orange peel for garnish

Instructions:

  1. Fill a glass with ice
  2. Pour Licor 43 over ice
  3. Brew espresso and let it cool slightly
  4. Pour espresso slowly over the liqueur
  5. Garnish with orange peel if desired

Version 3: Traditional Spanish Coffee Carajillo Ingredients:

  • 1 oz Spanish brandy
  • 1 oz anís (Spanish anise liqueur)
  • 1 shot espresso
  • Cinnamon stick for garnish

Instructions:

  1. Combine brandy and anís in a glass
  2. Heat the spirits with a steam wand or hot water bath
  3. Add freshly brewed espresso
  4. Garnish with cinnamon stick
  5. Serve hot

What to Serve With Carajillo:

  • Traditional Spanish cookies like polvorones
  • Small pastries or churros
  • Dark chocolate squares
  • Light breakfast items for morning carajillo

Top Tips for Perfecting Your Carajillo:

The success of these carajillo recipes depends largely on the quality of your ingredients. When sharing these carajillo recipes with friends, remind them that temperature and timing are crucial.

  1. Use quality coffee: Fresh, properly extracted espresso is crucial
  2. Temperature matters: Match your liquor temperature to your serving style
  3. Glass choice: Use clear glass to appreciate the layering
  4. Timing is everything: Add ingredients in the correct order for proper layering
  5. Don’t over-stir: Gentle mixing preserves the distinct layers

Common Mistakes to Avoid:

  • Using weak or bitter coffee
  • Adding too much liquor
  • Mixing ingredients too vigorously
  • Using cold glasses for hot versions
  • Adding ice to hot variations

Storing and Reheating Tips: Carajillo is best enjoyed fresh and shouldn’t be stored for later consumption. However, you can prep by:

  • Pre-chilling glasses for cold versions
  • Having ice ready for iced variations
  • Keeping spirits at room temperature
  • Storing coffee beans properly for optimal freshness

Remember, the perfect carajillo is about balance – between coffee and spirit, temperature and timing, tradition and personal preference. With these authentic recipes and tips, you’re well-equipped to create your own Spanish coffee masterpiece. ¡Salud!

Carajillo Recipe: 5 Easy Steps for the Perfect After-Dinner Drink

Imagine you’ve just had a great meal and you’re looking for something special. The carajillo recipe is here to make your evening unforgettable. It mixes espresso’s deep flavor with liqueur’s smoothness, pleasing both coffee fans and cocktail lovers.

The carajillo is more than a drink; it’s a cultural celebration. It comes from Spain and is loved in Mexico too. It’s a chance to enjoy a moment of pure joy, connecting you to a long history of food and drink.

Key Takeaways

  • Carajillo combines espresso and liqueur for a unique taste experience
  • Traditionally served as an after-dinner drink in Spain and Mexico
  • Can be prepared hot or cold depending on preference
  • Versatile recipe allows for multiple liquor variations
  • Typically takes only 5-10 minutes to prepare

Introduction to the Classic Spanish Coffee Cocktail

The carajillo is a beloved Spanish coffee cocktail. It combines the rich taste of espresso with spirits, making it a memorable drink. It’s enjoyed after dinner and has become popular worldwide.

Explore the world of the Spanish coffee cocktail. Learn about its journey through time and taste. The carajillo’s origins are filled with interesting stories from different places and cultures.

Origins and Cultural Significance

The carajillo’s history is complex and full of stories. It’s believed to have started in the 19th century. There are a few theories about how it began:

  • Spanish soldiers mixing coffee with rum during military campaigns
  • Workers seeking a quick energy boost during long shifts
  • Catalonian laborers creating a strong, invigorating beverage

From Spain to Mexico: Evolution of the Drink

The drink traveled from Spain to Mexico, changing in exciting ways. Mexican bartenders added local touches like Licor 43. They also changed how it’s made to fit local tastes.

Why It’s Called Carajillo

The name “carajillo” is interesting. Some think it comes from coraje (courage), because of its strong taste. Others believe it comes from carajo, showing its bold nature.

Today, the carajillo is loved in Spain, Mexico, and the U.S. It’s a tasty link to cultural heritage.

Essential Ingredients for Your Carajillo

Making the perfect carajillo starts with knowing its key ingredients. This Spanish coffee cocktail needs two main things: top-notch espresso and a special liquor. This liquor adds depth and character to the drink.

The traditional carajillo recipe has a specific mix of ingredients. These work together to create a balanced flavor. Here are the main things you’ll need:

  • Espresso: A rich, freshly made espresso shot is the base of a great carajillo. Use about 2 oz of high-quality espresso to get the drink’s true essence.
  • Licor 43: This unique Spanish liqueur is the go-to spirit for a real carajillo. With its secret mix of 43 ingredients, Licor 43 brings a sweet and aromatic depth.
  • Optional Sweetener: A bit of simple syrup can make the flavor even better.

While Licor 43 is the traditional choice, you can also use other liquors. Some options include:

  1. Brandy
  2. Rum
  3. Mezcal (for a more adventurous twist)

The beauty of a carajillo is in its simplicity. Each ingredient is important for a balanced and memorable drink. Whether you love coffee or cocktails, learning about these ingredients will improve your mixology skills.

Understanding Licor 43: The Key Component

Licor 43 is the star of the carajillo liquor world. Since 1946, it has been a favorite in Spain and around the globe. Its unique vanilla flavor has won many hearts.

This liqueur adds a special touch to coffee, making it unforgettable. It’s made from a secret mix of 43 herbs and spices. This blend creates a unique taste adventure.

Flavor Profile Breakdown

Licor 43’s flavor is a mix of:

  • Vibrant vanilla notes
  • Subtle citrus undertones
  • Warm cinnamon hints
  • Rich cocoa essence
  • Delicate orange peel accents

Why Licor 43 Rocks Your Carajillo

Licor 43 has 31% alcohol, making it perfect for carajillos. Its lower alcohol content makes the drink smoother. It pairs well with espresso.

Alternative Options

If Licor 43 is hard to find, try these:

  1. Vanilla-based liqueurs
  2. Herbal liqueurs with citrus notes
  3. Amaretto (for a nutty twist)

Licor 43 offers a unique carajillo experience. It’s perfect for those who love trying new drinks. It brings a taste of Spanish culture to your glass.

The Perfect Espresso for Your Drink

Espresso preparation for carajillo

Making the perfect carajillo starts with the right espresso. Your coffee choice is crucial. It must balance the sweet Licor 43.

When picking espresso for your carajillo, keep these points in mind:

  • Roast level: Dark roasts give a strong flavor
  • Bean origin: Colombian or Brazilian beans add smooth richness
  • Freshness: Use freshly ground coffee beans

You don’t need a fancy espresso machine to make a great shot. Moka pots and portable espresso makers work well. The goal is a strong coffee that can handle the liqueur’s sweetness.

Carajillo searches on Yelp have jumped by 118% this year. This shows more people want to try this coffee cocktail. It’s a mix of espresso and Licor 43, perfect for after dinner.

Pro tip: Go for a 1-ounce espresso shot with a rich crema. This ensures your carajillo has the right coffee-to-liqueur mix. It makes the drink truly special.

Carajillo Recipe: Step-by-Step Instructions

Making the perfect carajillo is an art. It combines rich espresso with smooth Licor 43. This classic cocktail has been loved by many for years. Let’s explore how to make it with care and passion.

Preparation Time and Serving Size

Your carajillo journey is quick. Here’s what you’ll need:

  • Total preparation time: 5 minutes
  • Serving size: 1 cocktail
  • Perfect for an after-dinner treat or midday pick-me-up

Essential Equipment

Here are the tools you need to make your carajillo:

  1. Espresso machine or strong coffee maker
  2. Measuring jigger
  3. Rocks glass or small cocktail glass
  4. Optional: Cocktail shaker for cold version

Mixing Technique

The classic carajillo recipe is simple. It’s one part espresso to one part Licor 43. If you like more coffee, try two parts espresso to one part liqueur.

  • Brew a fresh, hot double shot of espresso
  • Pour two ounces of Licor 43 into your glass
  • Slowly add the hot espresso
  • Optional: Shake with ice for a chilled version

Pro tip: Try different ratios to find your favorite. Some bartenders add orange peel or cinnamon for extra flavor in their carajillo.

Serving Suggestions and Presentation Tips

Make your carajillo stand out with these expert tips. The right glass and garnish can turn a simple drink into a showstopper. It’s all about creating a memorable experience.

When serving carajillo, you have several stylish options to choose from:

  • Nick and Nora glasses for an elegant, classic look
  • Coupe glasses for a vintage-inspired presentation
  • Old-fashioned or rocks glasses for a more casual approach

Temperature is key in serving carajillo. Traditionally, it’s enjoyed hot. But, modern mixologists suggest trying both warm and chilled:

  1. Warm carajillo: Perfect for chilly evenings
  2. Chilled carajillo: Ideal for summer gatherings
  3. Room temperature: A balanced serving option

To enhance your carajillo presentation, consider these garnishing techniques:

  • Sprinkle whole coffee beans on top
  • Add a delicate citrus twist
  • Dust with ground cinnamon for extra flavor

Pro tip: Serve your carajillo right away. This keeps it at the best temperature and flavor. The presentation and serving style are just as important as the ingredients.

Variations and Customizations

Exploring carajillo variations lets you make this classic Spanish coffee your own. You can stick to the traditional or try new twists. This way, you can make your carajillo just right for you.

Your carajillo journey can go in many exciting directions. You can choose from different temperatures and regional flavors. Each one adds its own special touch to this favorite drink.

Hot and Cold Serving Styles

Carajillo comes in many serving styles to fit your taste:

  • Hot Carajillo: A classic warm version perfect for chilly evenings
  • Iced Carajillo: Refreshing summer alternative with 10 ounces of total volume
  • Latte-style preparations with varied milk proportions

Decaffeinated Alternatives

For those who want flavor without caffeine, decaf espresso is a great choice. It keeps the drink’s rich taste but cuts down on caffeine.

Regional Flavor Differences

Regional variations show the drink’s cultural richness:

  1. Spanish version: Traditional rum or Licor 43 base
  2. Mexican adaptation: Often uses different local spirits
  3. Carajillo Epoca: Includes Aguardiente with unique ingredient combinations

Every region adds its own twist with local ingredients and traditions. This makes carajillo a dynamic and exciting cocktail experience.

Best Food Pairings with Carajillo

Carajillo Food Pairings and Desserts

Make your carajillo experience even better by finding the right food pairings. This Spanish coffee cocktail pairs well with many dishes. Its unique taste makes it a great match for different foods.

For desserts, carajillo is perfect with rich, indulgent treats. Here are some great choices:

  • Chocolate-based desserts: Dark chocolate mousse or flourless chocolate cake
  • Traditional Spanish almond pastries
  • Crème brûlée with its caramelized sugar top
  • Tiramisu – a natural coffee-inspired companion

But carajillo isn’t just for sweets. It also goes well with savory foods for a balanced taste:

  • Aged Spanish cheeses
  • Tapas with mild spices
  • Lightly salted nuts
  • Olive-based appetizers

The drink’s 31% alcohol and complex flavor from Licor 43 make it great for both sweet and savory pairings. Whether it’s after dinner or a late-night snack, carajillo is a sophisticated choice. It will excite your taste buds.

Conclusion

The carajillo recipe is a delightful Spanish coffee cocktail that mixes tradition with modern mixology. It’s a drink that can turn an ordinary evening into a special moment. It’s not just a drink; it’s a way to enjoy your senses.

This drink has many benefits, like waking up your taste buds or being a fancy after-dinner drink. It’s a simple yet elegant cocktail that you can make your own. You can stick to the classic version or try different flavors.

Each carajillo you make tells a story of Spanish food culture. The best part is how it combines strong espresso with smooth liqueur. It’s a drink that celebrates flavor, culture, and creativity.

Now that you know how to make a carajillo, you can impress your friends. You’ll be enjoying a tradition that connects coffee lovers from all ages.

Tagged : / / /

tuna tartare recipe: 5 Best Fresh Flavor Hacks

The first time I tasted tuna tartare, it was a game-changer. My taste buds were thrilled with the fresh sushi-grade tuna’s vibrant flavors. It was diced and seasoned just right.

Since then, I’ve been on a quest to make the best appetizer recipes. I want to turn raw fish into a masterpiece.

Imagine making a simple dish into a gourmet delight. This tuna tartare recipe is more than a meal. It’s a journey of flavors and creativity that will change your cooking.

Creating the perfect tuna tartare is all about the right ingredients and techniques. It’s about finding the best sushi-grade tuna and mastering flavor. These five hacks will elevate your raw fish skills.

Understanding Tuna Tartare Origins and Traditions

Tuna tartare is a culinary journey that mixes old traditions with new cooking ways. It started in the 1980s in Los Angeles. Chefs there began to play with raw fish from Asian cuisine.

In 1984, chef Shigefumi Tachibe made tuna tartare at Chaya Brasserie. He created it for people wanting lighter food during the low-fat trend.

Cultural Evolution of Raw Fish Dishes

Raw fish dishes have a long history in many cultures. Here are some examples:

  • Hawaiian poke with its fresh fish cubes
  • Peruvian ceviche featuring citrus-cured seafood
  • Traditional Japanese sashimi techniques

Japanese-French Fusion History

The story of tuna tartare shows how cooking styles mix. Chefs combined Japanese raw fish methods with French ways. This created a new way to enjoy sushi-grade tuna.

Traditional Preparation Methods

Making real tuna tartare needs care and respect for the ingredients. Choosing the right raw fish is key. Ahi tuna is the top choice, showing the importance of both skill and quality in this dish.

The rise of tuna tartare shows the power of fusion cuisine. It shows how different cooking traditions can come together to make something new and exciting.

Essential Ingredients for Perfect Tuna Tartare

Starting with the right ingredients is key to making great tuna tartare. You’ll need top-notch sushi-grade tuna, the main attraction. The tuna’s freshness and quality are crucial for a delicious dish.

Here are the main ingredients you’ll need:

  • 300g premium sushi-grade tuna
  • 2 teaspoons olive oil
  • 1 tablespoon soy sauce marinade
  • 1 tablespoon fresh lime juice
  • 1/4 teaspoon kosher salt
  • 1 tablespoon finely chopped red onion
  • 1/2 celery stick, finely chopped
  • 3/4 cup diced cucumber
  • 1 ripe avocado, chopped
  • 1/4 cup microgreens for garnish

The secret to a great tuna tartare is finding the right balance of flavors. A zesty ginger dressing adds a bright, tangy taste that goes well with the tuna. Soy sauce marinade brings depth, and cucumber and avocado add different textures.

When making your tuna tartare, timing is everything. Marinate the tuna for just 10 minutes to keep its natural flavors. This way, you’ll get to enjoy the tuna’s tender taste and smooth texture.

Selecting and Preparing Sushi-Grade Tuna

Making a great tuna tartare begins with picking the best sushi-grade tuna. Knowing what to look for and how to prepare it is key. This turns your simple recipes into something special.

Quality Indicators for Raw Tuna

When you’re choosing sushi-grade tuna, keep an eye out for these important signs:

  • Vibrant, deep red or pink color
  • Firm, dense texture without mushiness
  • Clean, ocean-fresh smell (no strong fishy odor)
  • Minimal visible connective tissue

Proper Cutting Techniques

When cutting raw fish for tartare, precision is key. Follow these expert tips:

  1. Select a razor-sharp knife specifically for fish
  2. Cut against the grain for optimal texture
  3. Create uniform cubes approximately ¾ inch in size
  4. Work on a chilled surface to maintain tuna’s integrity

Temperature Control Tips

Keeping the right temperature is vital for food safety with sushi-grade tuna. The FDA suggests buying tuna that’s been frozen before to kill parasites. Store your raw fish in the fridge at 40°F or below. Work fast to stop bacteria from growing.

Pro tip: Always buy tuna from trusted suppliers who sell sashimi-grade products. This ensures the best quality and safety for your recipes.

Classic Tuna Tartare Recipe

Tuna Tartare Appetizer Recipe

Make a tasty no-cook appetizer that will wow your guests with this classic tuna tartare. It’s a gourmet dish that combines fresh flavors and simple steps. You’ll feel like you’re in a restaurant, but it’s made in your kitchen.

To make this delicious tuna tartare, you’ll need top-notch ingredients and a few easy techniques. Here’s what makes it stand out:

  • Fresh sushi-grade tuna (8 oz)
  • Premium soy sauce (¼ cup)
  • Sesame oil for depth of flavor
  • Crisp vegetables for texture

Here’s how to make your tuna tartare:

  1. Choose the best sushi-grade tuna
  2. Cut tuna into ¼-inch cubes
  3. Make your marinade with soy sauce, sesame oil, and rice vinegar
  4. Mix tuna with marinade gently
  5. Let it sit for 5-10 minutes

This appetizer is not only tasty but also healthy. Each serving has 28g of protein, omega-3 fatty acids, and only 323 calories. It’s also gluten-free and full of flavor.

Pro tip: Serve your tuna tartare right after marinating. Add sliced cucumber and garnish with sesame seeds. It looks elegant and will impress your dinner guests.

Asian-Inspired Flavor Enhancement Techniques

To make your tuna tartare better, learn about the flavors of Asian cuisine. The right mix of ingredients can turn a simple dish into a feast for your taste buds.

Creating the best tuna tartare is all about layering flavors. Here are some tips to make your dish stand out:

Sesame and Soy Combinations

Deepen your tuna tartare with a strong soy sauce marinade. The trick is to balance the umami:

  • Choose high-quality light soy sauce
  • Add toasted sesame oil for a nutty taste
  • Mix in rice vinegar for a bright note

Ginger and Wasabi Integration

Add heat and depth to your dish with ginger dressing techniques:

  • Grate fresh ginger for a strong flavor
  • Make a wasabi aioli for a creamy touch
  • Use finely minced ginger to avoid overpowering the tuna

Citrus Infusion Methods

Lighten your tuna tartare with the right citrus touches:

  • Try yuzu for true Asian notes
  • Add lime juice for a sharp, clean taste
  • Play with orange zest for a hint of sweetness

The aim is to boost, not hide, the tuna’s flavor. Each ingredient should blend well in your dish.

Creative Plating and Presentation Ideas

When making appetizers from Asian cuisine, how you present them is just as important as the taste. A good presentation can turn your tuna tartare into a feast for the eyes. It makes the dining experience unforgettable, pleasing both the eyes and the taste buds.

Here are some creative ways to present your tuna tartare:

  • Use ring molds for a professional, restaurant-style presentation
  • Create tall, architectural designs with layered ingredients
  • Serve in unique vessel types like ceramic spoons or glass cubes
  • Experiment with geometric arrangement of fish and garnishes

Garnishes are key to making your appetizer stand out. Try these eye-catching additions:

  • Delicate microgreens for height and freshness
  • Toasted sesame seeds for texture and crunch
  • Edible flowers for a touch of elegance
  • Thin radish slices for color contrast

In Asian cuisine, how things look is as important as how they taste. Your tuna tartare should be as beautiful as it is delicious. Each element should be carefully chosen and placed.

Pairing Suggestions and Side Accompaniments

Enhancing your tuna tartare experience is more than just the main dish. Choosing the right sides can turn this Asian appetizer into a memorable meal. The trick is to mix textures and tastes that match the tuna’s softness.

Complementary Textures

For tuna tartare, add crunchy bits to contrast with the fish’s smoothness. Here are some great choices:

  • Wonton chips for a crunchy base
  • Cucumber slices for a fresh, crisp texture
  • Toasted sesame crackers
  • Crisp lettuce cups for a light wrap

Beverage Recommendations

Match your appetizer with drinks that bring out the tuna’s flavors. Try these:

  • Dry white wines: Sauvignon Blanc or Pinot Grigio
  • Chilled sake for an authentic Asian cuisine experience
  • Light, crisp beers like pilsner
  • Citrus-based cocktails that complement the fish’s freshness

Your aim is to make a dining experience that showcases the tuna tartare’s flavors. It should also offer interesting textures.

Storage and Food Safety Guidelines

Tuna Tartare Food Safety

When making raw fish dishes like tuna tartare, keeping food safe is crucial. Your sushi-grade tuna needs careful handling for a tasty and safe dish.

Storing raw fish right is key to keeping it fresh and safe. Refrigeration is your best friend in keeping tuna tartare fresh.

  • Keep sushi-grade tuna at 40°F or below
  • Consume tartare within 24 hours of preparation
  • Store in an airtight container on the bottom refrigerator shelf
  • Avoid cross-contamination with other foods

Keeping the right temperature is important to stop bacteria from growing. Freezing can extend your tuna’s shelf life, up to 6 months at 0°F.

Look out for signs of spoilage like bad smells, color changes, or a slimy feel. These mean the tuna is not safe to eat. If unsure, throw it away to keep yourself safe.

Quickly putting the tuna in the fridge and avoiding room temperature is vital. Always use clean tools and surfaces to avoid contamination.

Conclusion

Learning to make tuna tartare turns a simple appetizer into a special dish. This dish from Asian cuisine lets you try new flavors quickly. By mastering how to prepare sushi-grade ahi tuna, you can make dishes as good as those in restaurants.

These tips show that tuna tartare is more than raw fish. It’s about mixing textures, adding ingredients, and showing off fresh ahi tuna. Try different marinades, garnishes, and ways to serve it to bring out its health benefits.

Tuna tartare is great for a quick meal or a fancy appetizer. Use what you’ve learned, from picking the best tuna to trying new flavors. Your skills will wow your guests and add a healthy, tasty dish to your menu.

Keep practicing to get better at making tuna tartare. Each time, you’ll get better and love this elegant dish more. Trust your taste, be adventurous, and enjoy making gourmet meals at home.

Tagged : / / / / /

pineapple cheese ball: How 3 Ingredients Transform the Taste

Imagine walking into a party where a single appetizer steals the show. That’s the magic of a pineapple cheese ball. It’s a sweet and savory snack that turns ordinary gatherings into unforgettable moments. This cream cheese ball mixes just three amazing ingredients for a flavor explosion that guests will love.

This pineapple cheese ball is all about simplicity. It’s quick to make and packs a big flavor punch. It’s perfect for any party, from holidays to casual get-togethers. It’s sure to be a hit with everyone.

The Perfect Sweet and Savory Party Appetizer

Get ready to discover a classic party finger food that has delighted guests for generations. The pineapple cheese ball is a quintessential holiday appetizer. It turns simple ingredients into a crowd-pleasing retro hors d’oeuvre.

Origins of the Classic Cheese Ball

Cheese balls emerged in mid-20th century American kitchens as a convenient and delicious party staple. Home cooks quickly embraced this versatile dish. It could be prepared in advance and served with minimal effort.

The combination of cream cheese, tangy pineapple, and crunchy nuts created a flavor profile that became an instant hit at social gatherings.

Why This Recipe Became a Holiday Favorite

Holiday gatherings demanded something special, and the pineapple cheese ball delivered. Its unique blend of sweet and savory elements made it a standout party appetizer. Families appreciated how easy it was to prepare and how elegantly it could be presented.

The Magic of Three Core Ingredients

The brilliance of this retro hors d’oeuvre lies in its simplicity. Just three key ingredients work together to create culinary magic:

  • Cream cheese: Provides a rich, creamy base
  • Crushed pineapple: Adds a bright, sweet tang
  • Pecans: Deliver a satisfying crunch and nutty flavor

When these ingredients combine, they create a party finger food that’s both nostalgic and irresistibly delicious.

Essential Ingredients for Your Pineapple Cheese Ball

To make a perfect tropical fruit cheese ball, you need the right ingredients. A few key components will mix sweet and savory flavors. This will bring your pineapple appetizer to life.

The base of this tasty cheese ball is high-quality ingredients. Here’s what you’ll need:

  • 16 ounces of cream cheese (softened)
  • 8 ounces of well-drained crushed pineapple
  • 1 1/2 cups of finely chopped pecans
  • 1/4 cup finely chopped green pepper
  • 2 tablespoons finely chopped green onions
  • 2 teaspoons of seasoned salt

Each ingredient is important for the cheese ball’s flavor. The cream cheese makes it smooth and holds it together. Crushed pineapple adds a sweet, bright taste that makes it special.

Pecans add a nice crunch and nutty flavor. Green peppers and onions give a fresh, crisp texture. Seasoned salt brings all the flavors together, making it a hit with your guests.

Pro tip: Make sure to drain the pineapple well. This prevents your cheese ball from being too wet. A well-drained pineapple gives your tropical appetizer the right consistency.

The Science Behind Sweet and Savory Flavor Combinations

Exploring the magic of a tropical fruit cheese ball reveals fascinating insights into flavor chemistry. Your taste buds experience a complex dance when sweet and savory elements meet. This creates a culinary experience that transforms a simple snack into a memorable appetizer.

The intricate world of flavor pairing goes beyond simple taste. When pineapple meets cream cheese, something extraordinary happens. The fruit’s natural sweetness cuts through the rich, tangy cream cheese. This creates a balanced flavor profile that tantalizes your palate.

How Pineapple Enhances Cream Cheese

Pineapple brings more than just sweetness to your tropical fruit cheese ball. Its unique enzymatic properties interact with cream cheese in surprising ways:

  • Introduces a bright, tropical flavor
  • Adds natural acidity that complements cream cheese’s richness
  • Provides moisture to prevent a dry texture

The Role of Pecans in Texture and Taste

Pecans are the unsung heroes of this delightful snack. They contribute crucial elements that elevate the entire experience:

  1. Provide a satisfying crunch that contrasts with creamy cheese
  2. Introduce a nutty undertone that balances sweet and tangy flavors
  3. Create visual and textural interest

By understanding these scientific principles, you can craft a cheese ball that’s not just a snack, but a culinary masterpiece.

Step-by-Step Preparation Guide

Making a delicious pineapple appetizer is simple. This cheese ball recipe is quick, taking just 35 minutes. It uses only three ingredients, making it a hit at any party.

First, get your ingredients ready and set up your workspace. The secret to a great cheese ball is being precise and skilled. Here’s how to prepare it:

  1. Drain the Pineapple: Use a fine-mesh strainer to get rid of extra moisture. This keeps the cheese ball from being soggy.
  2. Soften Cream Cheese: Let the cream cheese warm up at room temperature for 45 minutes. This makes it easy to mix.
  3. Combine Ingredients: Mix the cream cheese, shredded cheeses, and chopped pineapple in a big bowl.
  4. Chill the Mixture: Put it in the fridge for 30 minutes. This helps the cheese ball keep its shape.

When shaping the cheese ball, be gentle. Use your hands to make a tight ball, making sure everything is mixed well. Then, roll it in chopped pecans for a crunchy outside that tastes great.

  • Preparation time: 5 minutes
  • Chilling time: 30 minutes
  • Total servings: 8
  • Calories per serving: 229 kcal

Pro tip: For the best taste, make your pineapple cheese ball at least an hour before you serve it. It can stay in the fridge for up to a week. This makes it perfect for planning ahead for parties.

Tips for Achieving the Perfect Texture

Making a great cream cheese ball for your party is all about texture and prep. The right steps can turn your snack into a hit.

To make the perfect cream cheese ball, focus on three key areas: draining, temperature, and shaping. Let’s dive into how to make your party snack stand out.

Proper Draining Techniques

Too much moisture can mess up your cream cheese ball’s texture. Here’s how to handle pineapple:

  • Use a fine-mesh strainer to remove liquid
  • Pat pineapple chunks dry with paper towels
  • Let pineapple sit in the strainer for 10-15 minutes

Temperature Control Methods

Getting the cream cheese right is key for a smooth snack. Here are some tips:

  • Remove cream cheese from fridge 30 minutes before mixing
  • Let ingredients warm up to room temperature for easier mixing
  • Chill mixture for at least 1 hour before final shaping

Shaping and Rolling Tips

The look of your cream cheese ball matters. Here’s how to make it look pro:

  1. Use clean, slightly damp hands when shaping
  2. Roll gently to keep it smooth
  3. Cover completely with chopped pecans for a stunning look

Follow these tips, and your cream cheese ball will wow your guests. It’ll be the star of your party.

Creative Serving Suggestions and Pairings

Pineapple Cheese Ball Serving Ideas

Turn your pineapple cheese ball into a stunning appetizer that will wow guests at any holiday party. This dish is versatile, making it perfect for different serving styles. It can be a real showstopper.

Here are some creative ways to present your holiday appetizer:

  • Arrange on a rustic wooden board with an assortment of crackers
  • Pair with crisp vegetable sticks for a fresh crunch
  • Serve alongside fresh fruit slices like apple or pear
  • Create an elegant charcuterie display with complementary meats

For the best taste, try these pairing suggestions:

  1. Crackers: Opt for water crackers or wheat thins for a clean taste
  2. Breads: Toasted baguette slices or crostini are great choices
  3. Vegetables: Cucumber rounds and bell pepper strips add a nice crunch

Your pineapple cheese ball can be the highlight of any appetizer table. Try out different ways to serve it to make it unforgettable.

Make-Ahead and Storage Instructions

Planning ahead is key when preparing a delicious cheese ball recipe for your next party finger food spread. Your pineapple cheese ball can be a stress-free addition to any gathering with the right preparation and storage techniques.

This cheese ball recipe is perfect for making ahead. You can make it up to 3 days before your event. This gives you time to focus on other party details.

Refrigeration Guidelines

Proper storage is crucial to maintaining the quality of your cheese ball. Follow these essential guidelines:

  • Wrap the cheese ball tightly in plastic wrap
  • Store in the refrigerator at 40°F or below
  • Keep away from strong-smelling foods to prevent flavor absorption

Freshness Duration Tips

To ensure your cheese ball remains fresh and delicious, keep these tips in mind:

  1. Consume within 3-5 days of preparation
  2. Remove from refrigerator 30 minutes before serving to soften
  3. Check for any signs of spoilage before serving

Pro tip: Always bring your cheese ball to room temperature for the best flavor and texture when serving at your next party.

Nutritional Benefits and Portion Control

Pineapple Cheese Ball Nutrition

Your favorite sweet and savory snack, the pineapple cheese ball, is more than tasty. It’s also packed with nutrients. Each bite gives you a mix of good stuff from its ingredients.

Let’s look at what makes this pineapple cheese ball so good for you:

  • Cream cheese gives you protein and calcium
  • Pineapple adds vitamin C and antioxidants
  • Pecans bring healthy fats and minerals

It’s important to control how much you eat. A good serving size is 2-3 tablespoons. This way, you can enjoy it without eating too much.

If you’re watching your diet, here are some tips:

  1. Choose low-fat cream cheese
  2. More pineapple, less cheese
  3. Try it with veggie sticks instead of crackers

Knowing the nutritional benefits lets you enjoy this snack as part of a healthy diet. The pineapple cheese ball is a tasty way to add variety to your meals.

Seasonal Variations and Adaptations

Transform your pineapple appetizer with creative seasonal twists. A tropical fruit cheese ball is incredibly versatile. You can try different ingredients while keeping the creamy texture. Swap pineapple for fresh mango or papaya in summer for a light and refreshing twist.

In winter, roll your cheese ball in crushed pistachios or add dried cranberries for a festive look. For those with nut allergies, use toasted sunflower or pumpkin seeds for crunch. The goal is to balance flavors and keep the cheese ball creamy and tasty.

Holiday events are great for customizing your cheese ball. Add herbs like rosemary for Christmas or roasted red peppers for the Fourth of July. Your creativity can turn this classic appetizer into a unique dish that captures the season’s spirit.

Remember, experimenting is fun in the kitchen. Start with small batches when trying new things. Don’t be afraid to mix unexpected ingredients. Your taste buds will help you create unique, memorable cheese ball recipes that wow guests at any event.

Tagged : / / / / / / / / /

Ground beef crock pot recipes: 7 Must-Try Beef Meals

As a busy parent, getting a tasty meal ready after a long day can be tough. Ground beef crock pot recipes are a big help. Imagine coming home to the warm smell of slow-cooked beef that’s ready to eat.

These recipes are more than just food. They’re a solution for families looking for easy, tasty meals. With little prep and lots of flavor, they turn simple ingredients into something amazing. Your family will love gathering around the table for these dishes.

Whether you’re an experienced cook or just starting, these slow cooker beef dishes are for you. You’ll find everything from hearty casseroles to rich soups. Ground beef in a crock pot is incredibly versatile and delicious.

Why Slow Cooker Ground Beef Meals Are Perfect for Busy Families

Work, kids, and home chores can make dinner time stressful. One-pot meals are a big help for families wanting tasty, affordable meals with little prep. Slow cooker ground beef recipes are great for busy weeknights.

Benefits of Using a Crock Pot

Crock pots make cooking easier. They let you make big, tasty dinners with hardly any effort. Just start your meal in the morning, and come home to a ready-to-eat dinner.

  • Minimal hands-on cooking time
  • Consistent, even cooking
  • Tenderizes tough meat cuts
  • Locks in flavor and nutrients

Time-Saving Tips for Meal Prep

Make cooking faster with these tips. Get ingredients ready the night before, use recipes that freeze well, and get a slow cooker that warms food automatically.

  1. Chop vegetables in advance
  2. Brown ground beef before adding to the crock pot
  3. Use pre-measured spice mixes
  4. Create weekly meal plans

Cost-Effectiveness of Ground Beef

Ground beef is cheap and great for meals on a budget. Slow cooker recipes make it easy to turn cheap ingredients into yummy meals for the whole family.

Pro tip: Buy ground beef in bulk and freeze portions for future meals to maximize savings!

Essential Tips for Cooking Ground Beef in Your Crock Pot

Learning to cook ground beef in your slow cooker is easy. It opens up a world of tasty comfort food with minimal effort. Many people think it’s hard, but it’s actually quite simple.

Before you start making your hearty stews, here are some key tips:

  • Always brown ground beef before adding to the slow cooker for enhanced flavor
  • Drain excess fat to prevent greasy meals
  • Use lean ground beef (90% or higher) for healthier dishes
  • Season meat generously before slow cooking

Cooking times can vary based on your recipe and how much meat you use. Typically, ground beef takes 2-4 hours on High setting. A standard crock pot can handle 2-4 pounds of meat without overcrowding. For the best results, aim to cook approximately 1 pound of ground beef at a time.

Safety is crucial when cooking ground beef. Make sure the internal temperature reaches 160°F to kill harmful bacteria. Using a meat thermometer ensures perfect, safe results every time.

Meal prep fans will love the convenience of batch cooking ground beef. You can prepare multiple portions and store them in the freezer for up to 4 months. This makes weeknight dinners a breeze.

  • Store cooked ground beef in airtight containers
  • Label containers with the date of preparation
  • Freeze in 1-pound portions for easy measuring

With these tips, you’ll turn your crock pot into a versatile tool for making delicious, stress-free meals. Your whole family will love them.

Must-Try Ground Beef Crock Pot Recipes

Transforming your family dinners is easy with these tasty ground beef crock pot recipes. Comfort food doesn’t have to be hard to make. Your slow cooker makes it simple to create hearty meals everyone loves.

Discover three amazing easy recipes that will be favorites in your home. These dishes show that slow cooker ground beef meals are simple yet satisfying.

Slow Cooker Tater Tot Casserole

This classic family dinner is a mix of comfort and ease. It’s perfect for busy families. The tater tot casserole combines ground beef, crispy potatoes, and creamy cheese in one dish.

  • Prep time: Under 15 minutes
  • Serves: 8 people
  • Freezer-friendly option available

Creamy Cheeseburger Soup

Imagine a soup that tastes like a cheeseburger. This slow cooker recipe turns ground beef into a creamy, comforting meal. It will warm you up from the inside.

  • Total cooking time: 4-6 hours
  • Rich in protein
  • Easy to customize with toppings

Classic Slow Cooker Meatballs

No ground beef collection is complete without meatballs. These tender, flavorful bites are great over pasta, in sandwiches, or as an appetizer.

  • Serves: 6-8 people
  • Great for meal prep
  • Freezes beautifully for up to 3 months

With these easy recipes, your crock pot becomes a meal-prep powerhouse. Enjoy delicious, hassle-free cooking that brings your family together.

Comforting Ground Beef Casseroles for Your Slow Cooker

Ground Beef Crock Pot Casserole

Looking for a tasty one-pot meal that brings your family together? Slow cooker ground beef casseroles are perfect for busy homes. They turn simple ingredients into delicious meals that everyone will enjoy.

Imagine coming home to a warm, flavorful casserole. Your slow cooker makes it happen, so you can enjoy great family dinners with little effort. These casseroles are easy to make and can be customized to suit everyone’s taste.

  • Perfect for busy weeknights
  • Minimal prep time required
  • Packed with nutritious ingredients
  • Easy to customize for different tastes

Here are some tips for making ground beef casseroles:

  1. Brown the ground beef before adding to the slow cooker for extra flavor
  2. Choose lean ground beef to reduce excess fat
  3. Layer ingredients strategically for optimal taste
  4. Experiment with different cheese and pasta combinations

Each casserole serves 6 people and cooks in 4-6 hours on LOW heat. With about 395 calories per serving, they’re both tasty and healthy.

Pro tip: Assemble ingredients the night before for an even easier cooking experience!

Hearty Soups and Stews with Ground Beef

When it gets cold, nothing beats a warm bowl of hearty stew with ground beef. These dishes turn simple ingredients into tasty meals that nourish both body and soul. Slow cookers make these recipes easy to make.

Ground beef is a great protein for many soups and stews. It makes meals that are both nutritious and affordable. You can try out different flavors and ingredients with ground beef.

Rich and Flavorful Slow Cooker Chili

Chili is a favorite comfort food for many. With a few ingredients, you can make a delicious meal for up to 6 people. Here are some tips for the best slow cooker chili:

  • Use lean ground beef for healthier results
  • Layer spices for deeper flavor complexity
  • Include a variety of beans for texture
  • Top with shredded cheese and sour cream

Hamburger Vegetable Soup

Hamburger vegetable soup is a nutritious choice. It combines ground beef with fresh vegetables. Here’s what you need:

  1. 2 pounds lean ground beef
  2. 4 large carrots, chopped
  3. 2 stalks celery
  4. 2 bell peppers
  5. 1 quart chicken or beef broth

Taco Soup with Ground Beef

Taco soup brings Mexican flavors to your dinner. It’s a mix of tacos and a warm stew. Pro tip: Add your favorite toppings like tortilla strips or cilantro.

These recipes take 4-8 hours in your slow cooker. They’re great for busy families looking for tasty, healthy meals.

Italian-Inspired Ground Beef Crock Pot Dishes

Turn your kitchen into an Italian trattoria with delicious slow cooker beef dishes. These meals bring Italy’s rich flavors to your family dinners. They’re easy to make, thanks to their one-pot nature.

Slow cooking lets herbs and spices deeply flavor your ground beef. This creates amazing tastes that feel like a trip to Italy. Letting ingredients simmer for hours makes the flavors rich and complex.

  • Classic Slow Cooker Bolognese Sauce
  • Italian Meatballs in Tomato Sauce
  • Creamy Lasagna
  • Hearty Pasta Casseroles

These recipes are great for busy families wanting authentic Italian food. They require little time to prepare and cook. You can make meals that taste like restaurants with just a few minutes of effort.

Pro tip: Many Italian-inspired ground beef crock pot dishes can be made ahead and frozen for up to 3 months. This makes planning meals easy. Your family will enjoy these comforting, flavorful dishes that bring Italy to your table.

Budget-Friendly Slow Cooker Ground Beef Meals

Eating tasty family dinners doesn’t have to cost a lot. Slow cooker ground beef recipes are a great way to save money. They turn simple ingredients into delicious meals that everyone will enjoy.

Creating healthy and tasty meals on a budget is possible. Your crock pot can make dinners that seem fancy but are actually affordable. This makes cooking fun and budget-friendly.

Poor Man’s Stew: A Classic Budget Meal

The Poor Man’s Stew shows how ground beef can be made into a big, filling meal. It only costs about $10 to make. This recipe includes:

  • 1.5 pounds ground beef
  • Potatoes
  • Carrots
  • Onions
  • Beef broth

Simple Ground Beef and Rice Dishes

Rice-based meals are great for families looking for cheap dinner options. They need just a few ingredients but taste amazing. Pro tip: Brown the ground beef before adding it to your slow cooker for better taste.

Slow Cooker Hobo Dinner

The Hobo Dinner is another great budget meal that mixes ground beef with veggies. It cooks for about 5 hours and feeds 8 people. It’s perfect for big families or meal prep.

By trying these budget meals, you can have delicious dinners without spending a lot. Your crock pot is key to making tasty, affordable meals that everyone will love.

Make-Ahead Ground Beef Freezer Meals for Your Crock Pot

Make-Ahead Ground Beef Freezer Meals

Make your meal planning easier with ground beef freezer meals for your crock pot. These meals turn your crock pot into a time-saving kitchen hero. Busy families can now enjoy tasty, hands-off cooking without dinner stress.

Preparing freezer meals is a big game-changer for home cooks. With just 1 hour of prep, you can make up to 6 freezer-friendly meals. These meals save you hours on busy weeknights. The secret is smart prep and strategic cooking.

  • Buy ground beef in bulk when it goes on sale
  • Prepare meals in advance
  • Freeze for up to three months
  • Thaw and cook in your crock pot

Easy recipes are key to successful meal planning. Here are some freezer meal tips:

  1. Choose versatile ground beef recipes
  2. Use quality, organic ingredients when possible
  3. Label and date your freezer meals
  4. Rotate meals to maintain variety

Pro tip: Most ground beef crock pot freezer meals can be prepped in 30 minutes. They cook on low for 10-12 hours or on high for 4-6 hours. This makes meal planning easy for families with busy schedules.

By spending a bit of time upfront, you’ll fill your freezer with delicious, nutritious meals. These meals are ready to heat and serve. Your future self will be grateful for these smart, time-saving meal prep solutions!

The Best Ground Beef Slow Cooker Recipes for Meal Planning

Learning to make meals ahead of time can make dinner prep easier. Ground beef slow cooker recipes are great for busy families. They offer flexibility for all family sizes and meal plans.

Planning your meals can cut down on weeknight stress. Most recipes need only 10-15 minutes to prepare. They cook for 30 minutes to 8 hours. You can freeze cooked ground beef for up to 3 months for quick meals.

Weekly Meal Prep Strategies

Batch cooking ground beef recipes is a smart move. Recipes like California Tamale Pie and Slow-Cooker Spaghetti and Meatballs serve 12 people. This is ideal for big families or making extra meals. Buying ground beef in bulk can save you 10% to 30% off.

Storage and Reheating Tips

Portion control is important when storing slow cooker meals. A serving is 1 to 1.5 cups, with 20-30 grams of protein. Cool meals before refrigerating and use within 3-4 days or freeze. Reheat slowly to keep moisture and flavor, using a microwave or stovetop with broth.

Recipe Variations for Variety

Change up your meals by trying different proteins and spices. Swap ground beef with turkey, chicken, or pork. Add new flavors with cheese or side dishes. With 38 recipes, you’ll always have something tasty to make.

Tagged : / / / / /

What is Invisible Apple Cake (Gâteau Invisible) and How to Make It?

Imagine cutting into a cake where apples seem to move between layers of soft batter. This creates a magical sight. The invisible apple cake, or Gâteau Invisible, is a French wonder that turns simple things into a special dessert. It’s a moist cake that feels like stepping into a Parisian bakery with its fancy look and deep taste.

Starting your journey with invisible apple cake means learning about its special charm. Unlike regular apple cakes, this dessert has apple slices so thin they almost blend into a creamy batter. This makes each slice look almost clear.

This cake comes from French baking traditions and has won the hearts of many. It’s easy to make but needs skill to get its unique look. With a few ingredients and some practice, you can make this amazing cake. It’s as beautiful to see as it is to eat.

Understanding the Magic Behind Gâteau Invisible

Explore the magical world of Gâteau Invisible, a French dessert that turns simple ingredients into a masterpiece. This cake has won the hearts of many, offering a new twist on apple desserts.

Origins and Cultural Significance

The Gâteau Invisible comes from France, showing off innovative baking. It’s not always egg-free or vegan, but it has inspired many to try new things. It became very popular in Japanese bakeries in the last ten years, showing it’s loved worldwide.

Why It’s Called “Invisible”

The cake’s name comes from its amazing look. Thinly sliced apples seem to vanish into a soft batter, creating magic. This happens because of a special layering method that mixes apples into the cake perfectly.

French Baking Traditions

French baking is known for its exactness and creativity. The Gâteau Invisible shows this by:

  • Using just a few ingredients
  • Emphasizing texture and look
  • Turning simple things into amazing desserts

Even though old recipes might not fit everyone’s diet, new versions have made it easier for more people to enjoy.

Essential Ingredients for Invisible Apple Cake

To make the perfect invisible apple cake, you need the right ingredients. These should blend well for a gluten-free baking experience. Start by gathering the necessary components for your healthy cake recipe.

The key ingredients for your invisible apple cake are:

  • 5-6 medium-sized apples (Elstar or Pink Lady recommended)
  • 1 cup (130g) spelt flour or gluten-free flour blend
  • 4 large eggs
  • 1/3 cup (80ml) milk or plant-based milk alternative
  • 1/3 cup (80g) melted butter
  • 1/3 cup (65g) xylitol or regular sugar
  • 1 teaspoon baking powder
  • 1/4 teaspoon ground cinnamon

When making your healthy cake, you can use different ingredients to make it your own. For gluten-free baking, use spelt or a gluten-free flour blend instead of wheat flour. This helps keep the cake’s texture light while meeting dietary needs.

Pro tip: Pick fresh, crisp apples with a sweet-tart taste. Slice them paper-thin with a mandoline. This creates the unique invisible layered effect that makes this French dessert special.

Choosing the Perfect Apples for Your Cake

Making a great jewish apple cake begins with picking the right apples. The success of your simple cake recipes depends on choosing apples that are both flavorful and hold their shape well.

Best Apple Varieties

Not all apples are the same when baking. For your invisible apple cake, consider these top varieties:

  • Fuji: Known for exceptional sweetness and firm texture
  • HoneyCrisp: Provides a perfect balance of tartness and sweetness
  • Braeburn: Offers excellent baking stability
  • Pink Lady: Delivers complex flavor profiles
  • Jonagold: Creates a rich, aromatic cake

Apple Preparation Tips

Proper apple preparation is key for the cake’s texture. Follow these essential tips:

  1. Use a mandoline to slice apples to 1/8-inch thickness
  2. Ensure uniform slice sizes for consistent baking
  3. Remove apple cores completely
  4. Peel apples to prevent tough skin in your cake

Storage and Ripeness

Choose apples that are firm but slightly ripe. Store your apples in a cool, dark place before baking. This keeps the flavor and texture at their best. Use apples within 1-2 weeks for the best results in your jewish apple cake.

Pro tip: You’ll need about 2 pounds of apples (about 4 medium-sized fruits) for a perfect invisible apple cake that serves 8 people.

Kitchen Tools and Equipment Needed

Baking Tools for Invisible Apple Cake

To make the perfect invisible apple cake, you’ll need some special kitchen tools. These tools will make baking easier and more fun. They help you make a beautiful hidden ingredient dessert.

Here are the must-have tools for your Gâteau Invisible:

  • 9-inch loaf pan – The perfect size for your cake’s shape
  • Parchment paper – For easy cake removal and clean release
  • Sharp mandoline or chef’s knife – Key for even apple slices
  • Large mixing bowls
  • Whisk or electric mixer
  • Measuring cups and spoons

Choose tools that are precise. A mandoline makes thin apple slices, which are key for the cake’s look. If you don’t have a mandoline, a sharp knife and careful hands will do. Aim for slices about 1/8 inch thick.

For a pro tip, line your loaf pan with parchment paper. Let the paper hang over the sides. This makes taking out and moving your cake much easier after it’s baked.

Step-by-Step Baking Instructions

Making a moist cake needs precision and care. The Invisible Apple Cake is a simple recipe that turns basic ingredients into a special dessert. Let’s go through the baking steps together.

Preparing the Perfect Batter

First, get your ingredients ready for this easy cake recipe. You’ll need:

  • 2/3 cup (90g) all-purpose flour
  • 1/2 cup (100g) sugar
  • 1 teaspoon aluminum-free baking powder
  • 1/4 teaspoon salt
  • 3 large eggs at room temperature
  • 1/3 cup each of heavy cream and whole milk
  • 3 tablespoons melted butter
  • 1 teaspoon vanilla extract

Mastering the Layering Technique

The secret to the “invisible” look is in layering the apples. Slice 6 Pink Lady apples thinly and arrange them in overlapping layers. This method gives the cake its unique translucent look.

Baking Time and Temperature Secrets

Bake at 375°F (190°C) for 40-45 minutes for a moist cake. It’s done when it’s golden brown and passes the toothpick test. Remember, let it cool completely before serving to allow the flavors to settle.

Your homemade Invisible Apple Cake will stay fresh for up to 3 days at room temperature or 5 days refrigerated. For longer storage, freeze it for up to 3 months.

Tips for Achieving the Perfect Texture

Invisible Apple Cake Texture Tips

Creating a moist cake needs precision and smart baking tricks. The secret to an amazing Invisible Apple Cake is knowing how each ingredient affects the texture.

Temperature is key for the perfect cake consistency. Here are some tips to make your cake moist:

  • Use ingredients at room temperature for smooth blending
  • Avoid overmixing to prevent a tough texture
  • Gently fold apple slices for even distribution

Your mixing technique greatly affects the cake’s moisture. Gentle folding stops gluten from making the cake dense and dry. Mix wet and dry ingredients just until they’re combined.

Here are some baking hacks for a perfect cake texture:

  1. Check apple moisture before adding to batter
  2. Use a toothpick to check if the cake is done
  3. Let the cake cool completely before slicing

The ideal baking temperature is 350°F for a moist interior. Keep an eye on your cake during the 22-27 minute baking time. This prevents it from drying out.

Pro tip: Let the cake rest for 10-15 minutes after baking. This ensures each slice is tender and enjoyable.

Serving Suggestions and Pairings

Creating memorable moments with your Invisible Apple Cake is more than baking. This unique dessert offers many serving options. These can change your cooking experience.

Make your hidden ingredient desserts stand out with these creative serving ideas. They mix old and new styles.

Traditional French Accompaniments

In classic French style, serve your cake with:

  • A light dusting of powdered sugar
  • A delicate drizzle of caramel sauce
  • A small scoop of vanilla bean ice cream

Modern Serving Ideas

For a modern twist, try these new serving methods:

  1. Pair with a fresh berry compote
  2. Serve alongside a dollop of Greek yogurt
  3. Garnish with toasted almond slices

Storage and Preservation

Proper storage keeps your Invisible Apple Cake tasty for days. Store it in an airtight container in the fridge for up to 5 days. If you freeze it, it stays good for 3 months.

Pro tip: Let the cake come to room temperature before serving. This brings out its flavor and texture.

Variations and Dietary Adaptations

Making an egg-free cake or vegan dessert doesn’t mean giving up on the Gâteau Invisible. With a few smart substitutions, you can make this classic French recipe fit different diets. It keeps its magical layers and delicate texture.

For a gluten-free baking approach, consider these alternative flour options:

  • Almond flour
  • Rice flour
  • Gluten-free all-purpose flour blend
  • Coconut flour

Vegan adaptations are surprisingly simple. Just replace traditional ingredients with plant-based ones:

  • Flax eggs instead of chicken eggs
  • Coconut milk or almond milk in place of dairy milk
  • Vegetable oil or coconut oil instead of butter

Try adding new flavors to your egg-free cake. Use warming spices like cinnamon or nutmeg. Or, swap apples for pears to make unique versions that still feel like the original Gâteau Invisible.

Pro tip: When making dietary changes, watch the moisture content. Adjust liquid ingredients to keep your cake light and fluffy.

Troubleshooting Common Baking Issues

Baking an Invisible Apple Cake can be tricky, but with these baking hacks, you’ll master this delicate simple cake recipe in no time. Understanding potential pitfalls helps you create a perfect dessert every time.

Achieving the right texture requires precision. When your apple layers aren’t becoming “invisible,” consider these key strategies:

  • Slice apples uniformly at 1/16 inch thickness for optimal translucency
  • Use firm apples like Granny Smith or Pink Lady that maintain structure while cooking
  • Coat apple slices thoroughly in batter to ensure proper blending

Temperature and timing are crucial in simple cake recipes. Maintain a consistent oven temperature of 375°F and bake for 50-55 minutes. Watch for these common issues:

  1. Wet cake: Reduce moisture by patting apple slices dry before battering
  2. Dry texture: Ensure precise measurements and avoid overbaking
  3. Uneven baking: Rotate the pan midway through cooking

Your baking hacks should include letting the cake cool completely—at least 2 hours—before slicing. This allows the structure to set properly and enhances the cake’s delicate layered appearance.

The Cultural Impact of Gâteau Invisible

The Gâteau Invisible has grown from a simple French dessert to a global hit. Social media has made it famous, loved by food lovers and home bakers everywhere.

Its unique look has caught the eye of chefs and photographers. The cake’s special layering makes it look magical when cut. This has made it a hit on Instagram and Pinterest.

  • Originated in France
  • Gained massive popularity in Japan
  • Inspired variations in multiple cuisines

The Gâteau Invisible reminds us of traditional Jewish apple cake. It shows how baking can bring cultures together. Both desserts use apples to create something amazing.

Food trends love hidden ingredient desserts, and the Gâteau Invisible is a perfect example. It turns simple ingredients into a stunning and tasty treat. This makes it a favorite for bakers who want to wow their guests.

The cake’s journey shows how creativity in cooking can make a local dish famous worldwide. It connects people through the love of good food.

Conclusion

The invisible apple cake is more than a tasty treat. It’s a masterpiece that turns simple ingredients into something amazing. Your journey shows how French baking and apples can create a stunning dessert.

Creating this cake takes patience, precision, and creativity. Each slice is a surprise of thin apple layers in a light batter. It’s a treat that will wow everyone you share it with. You can also try different apples and make it for special diets.

This cake is a perfect example of tradition meeting innovation in cooking. It’s not just a sweet treat. It’s a chance to see how simple ingredients can become something truly special.

Whether you’re an experienced baker or just starting, this cake is a great way to grow your skills. It’s a chance to enjoy the fun of making something beautiful and tasty.

Tagged : / / / / / / /